Things you will need:
1. The original of “Forgotten Worlds” (c) 1989 US Gold. The CAPS (SPS) version (number 1222) is the one I’ve used here.
2. An Amiga or a copy of UAE.
3. An Action Replay 3 cart (or ROM image for use w/ UAE above).
4. MFMWarp by Ferox (you can find the exe and all source on the WHDLoad site).
5. ReSource, or another suitable disassembler.
6. Asm-One, or your personal favourite assembler.
Before we begin, I want to point out this is *NOT* a full tutorial on how to crack “Forgotten Worlds”. It’s simply a game I chose at semi-random to investigate as part of the real reason for this tutorial – to explain the wonders of warping!
I’m sure many of you are familiar with warpers on the Amiga, but there are probably several people out there who perhaps aren’t quite sure what I’m talking about (don’t worry, this happens to me a lot).
At their most basic level all they are is a tool that reads data from a disk and stores it (compressed) in a file which can then be transferred somewhere else! As far as I know, Warp was originally a commercial program released by a company called SDS Software in 1987/88. If you are familiar with DMS (DiskMaSher), which became the ‘scene standard’ for uploads/releases, then you know what I’m talking about. In true scene style, the original warp was disassembled and modified by several crackers to allow various parameters (sync, tracklen etc.) which of course allowed a supplier to send the raw mfmdata from a custom format disk to a cracker via modem. The stages went something like this:-
1. Supplier picks up the game, and discovers that it is a custom-format disk.
2. Supplier warps the disk, and uploads it to the cracker.
3. Cracker disassembles the bootblock and studies/rips the loader (he needs the sync, tracklen and anything special regarding the mfm-decoding).
If everything is ok at this point (Cracker can retrieve the data from the warp once he has understood the disk format), then we can jump directly to step 6 below, otherwise:-
4. Cracker tells the supplier the parameters to use (or sends him a warper coded/patched specifically to read this game) to warp the rest of the disk.
5. Supplier images the disk using the information from the cracker, and sends him a complete warp of the custom format disk.
6. Cracker cracks it(!).
For the purposes of this tutorial we’re going to use Ferox’s MFMWarp because of its very useful plugin functionality. I know this tool is from 1994/95 but as its freely available (complete with sourcecode!), and I know that many crackers had custom tools which did exactly the same thing during the active years of the Amiga scene, it makes it easier to follow the tutorial.
The first step was always to try and copy the game, so here is the obligatory Xcopy picture:-

OK, this is good, since a tutorial on warping a DOS-copyable disk would be even more boring than this one 🙂
Before we can begin, you’ll need to create your warp file from the original:-
>>> mfmwarp read fwdisk01.wrp
The default arguments are “unit 0 low 0.0 high 79.1” which, helpfully, is exactly what we require!
NOTE: MFMWarp uses the arguments “track.side”, so a disk (usually) goes from 0.0 to 79.1.
First thing we need to do is rip the bootblock from the original game (of course you can skip this step and simply copy track 0 side 0 of the original to a test disk using Xcopy or similar).
This is a simple operation using MFMWarp, just write it out to your workdisk:-
>>> mfmwarp write fwdisk01.wrp unit 0 low 0.0 high 0.0
Congratulations! Now you have the bootblock of the game from your supplier (hehe), and it’s time to load ReSource and disassemble it so we can begin to probe the inner mysteries of the disk format used.
Insert your workdisk and use the “Disassemble Bootsector” option found in the “Macros 3” menu. Scroll down to the first “LEA” line, and then use the “Labels->Create multiple->All” option to give all the subroutines individual names. You’ll need to scroll down to the lines which begin with code like “BEQ START+$xx” and do “Labels->Create multiple->All” again to make the disassembly complete. Once you are happy with the disassembly ReSource has provided, save it to disk using the “Save asm->All” option as “fworigboot.s”.
Before we examine the disassembled bootblock it’s worth pointing out that at this stage we are only interested in the load/decode routines – nothing else matters just now! We just need the information that will enable us to write a piece of code to extract the contents of the original for us to crack. Once we load the bootblock code into Asm-One, we can clearly see what looks like the first call to the loader:-
LEA ($500).L,A1
MOVEQ #1,D0
MOVEQ #10,D1
BSR.W lbC000244
I’m sure some of you can guess the parameters for the loader already! If we continue just a few lines further in the disassembled code, we can see a second call to the same routine:-
LEA ($6A400).L,A1
MOVEQ #12,D0
MOVEQ #5,D1
BSR.W lbC000244
JMP ($6A400).L
This tells us that A1 is the load address, since it is passed to the loader and when it returns that location is jumped to immediately. It also gives us a reasonable guess at the other parameters by looking at the arguments passed for both calls:-
1st time: D0=01, D1=10
2nd time: D0=12, D1=05
So if the loader began at track 01 then loaded 11 tracks (guessing d1 is count-1, often used directly in a DBF loop for example) the next data would begin at track 12, which (surprise!) is exactly what D0 is set to for the 2nd loader call. Without even glancing at the code for the load routines, we can be fairly confident the parameters are:-
D0=Start track
D1=Number of tracks to load
A1=Load address
What we need in order to write a module for MFMWarp is the sync, the tracklength, and mfm-decode routines so lets start looking at the loader proper (lbC000244):-
lbC000244 LEA ($DFF000).L,A0
LEA ($BFD000).L,A2
MOVE.B #$7D,($100,A2)
ANDI.B #$F7,($100,A2)
MOVE.W #$8400,($9E,A0)
MOVE.W #$4489,($7E,A0)
MOVE.W ($80).L,D2
LSR.W #1,D2
MOVE.W D0,D3
LSR.W #1,D3
CMP.W D2,D3
Just a few lines of code, but now we know 2 things – the sync is $4489 (write to $DFF07E/DSKSYNC), and our guess that D0=start track was correct (the ‘current track’ is fetched from $80, and compared to the value in D0 before any necessary head-stepping is performed). Now we need to discover the size of a track, which we will always find in the code which performs the physical disk read (and verified by the mfm decoding routines). We just need to scroll down a bit more and we can see that the routine @ lbC0002EC holds the key to everything, so I’ll show you a commented version:-
lbC0002EC BTST #5,($BFE001).L
BNE.B lbC0002EC ;Wait for RDY signal from drive
LEA ($7C400).L,A3
MOVE.L A3,($20,A0) ;DSKPTH – set the MFM buffer address to $7C400
MOVE.W #$4000,($24,A0)
MOVE.W #$980A,($24,A0) ;DSKLEN – bit 15 set = DMA enable, bit 14 clear = READ
MOVE.W #$980A,($24,A0) ;DSKLEN – so ignoring bits 15/14, track length = $180A
lbC000312 MOVE.W ($1E,A0),D2
ANDI.W #2,D2
BEQ.B lbC000312 ;loop until DSKBLK is set (signifies disk block finished)
MOVE.W D2,($9C,A0)
MOVE.W #$4000,($24,A0)
CMPI.W #$4489,(A3) ;Check for our sync mark ($4489) to find track start
BNE.B lbC00032E ;If it wasn’t found assume we’re already in the right place to continue(!)
ADDQ.W #2,A3 ;If the sync was found, mfmbuffptr+2 so we’re pointing to next word
lbC00032E MOVE.W (A3)+,D4
MOVE.W (A3)+,D5
ANDI.W #$5555,D4
ANDI.W #$5555,D5
ADD.W D4,D4
OR.W D5,D4 ;Decode the track number in the MFM data
SUB.W D0,D4 ;Subtract the track we want from the track number
BNE.B lbC0002EC ;If != 0, we must be on the wrong track…
MOVE.W #$BFF,D2 ;counter-1, so this loop will decode $C00 words ($1800 bytes)
MOVE.W #$5555,D3
CLR.W D4 ;clear D4, used to store a checksum later
lbC00034C MOVE.W (A3)+,D5
MOVE.W (A3)+,D6
AND.W D3,D5
AND.W D3,D6
ADD.W D5,D5
OR.W D6,D5
MOVE.W D5,(A1)+ ;write decoded word to our load address (and dest++ for next time)
EOR.W D5,D4 ;D4 is a data checksum (rolling eor), see compare below
DBRA D2,lbC00034C ;loop until we’ve decoded $1800 bytes
MOVE.W (A3)+,D5
MOVE.W (A3)+,D6
AND.W D3,D5
AND.W D3,D6
ADD.W D5,D5
OR.W D6,D5 ;Decode the checksum in the MFM data
SUB.W D5,D4 ;Subtract the checksum stored on the track from the checksum we calced during mfm-decode above
BNE.W lbC0002EC ;If != 0, that was a fail so try again (checksums didn’t match)
RTS
Sorry for the big chunk of code, but since everything we need is in this one routine I thought commenting the disassembly was the easiest way to explain everything.
So all that remains is to steal/adapt bits of this code and create a usercode plugin for MFMWarp which extracts the data from our warped original. You’ll be pleased to hear that I’m not going to list that here, but if you’re interested you can find the source for this routine attached below. MFMWarp comes with several source code examples of how to create your own usercode plugins, one thing you will notice in all of them is something that initially puzzled me – take a quick peek at this snippet of code:-
;a0 = raw mfm buffer, a2 = buffer end, d2 = sync
.SL0: move.l (a0),d0
swap d0
addq.w #2,a0
moveq #16-1,d1
.SL1: cmp.w d2,d0
beq.s .FSync
.SC0: rol.l #1,d0
dbf d1,.SL1
cmp.l a2,a0 ;# Sync Not Found
bcs.s .SL0
What is happening here? Well, rather than just comparing a word (the sync from the mfm data) with the expected sync, it appears that we have to shift (well, rotate!) bits in order to find it… I came up with several overly complex ideas about why this was necessary, but the reason is actually very simple – big thanks to Wepl, author of the excellent WWarp (as well as a little program called WHDLoad), for his explanation.
When you warp a (non-standard/unknown format) disk, the read is done without any sync, simply reading as much data as is physically possible from each track into a buffer, compressing it and saving it into the warpfile. Without a sync there is no way to know exactly where the track data begins in the bitstream – hence the need to bitshift the data before attempting to match a sync! Of course once you have found the sync, you then use that same shift amount to correctly prepare the raw mfm data for decoding.
A very simple illustration:-
<MFMWarp buffer>
$A448 $9448 $92AA $4AAA $4A95 $4495 $12AA $AAAA
<Raw MFM buffer *after rol.l #4*>
$4489 $4489 $2AA4 $AAA4 $A954 $4951 $2AAA $AAAA
You can clearly see that in the first buffer our sync ($4489) is 4 bits out of position, so it is obvious what we have to do to fix it!
Anyway, back to this specific game…to execute the assembled usercode module on the warpfile, use this command:-
>>> mfmwarp write fwdisk01.wrp unit 0 low 1.0 high 79.1 sync $4489 wlen $180a usercode fwuser01.obj
My plugin simply dumps out each track as a separate file, so our next step is to create valid files from these track dumps.
If we go back to the 2 loader calls from the bootblock, we can see how to do this:-
D1_0001_000A.BIN = 11 tracks, starting at track 01 = $010800 (67584) bytes.
D1_000C_0005.BIN = 06 tracks, starting at track 12 = $009000 (36864) bytes.
A tiny piece of code that simply INCBINs (INClude BINary) the tracks you need into memory is probably the easiest way to proceed. Fire up your assembler of choice, and create something that looks like this:-
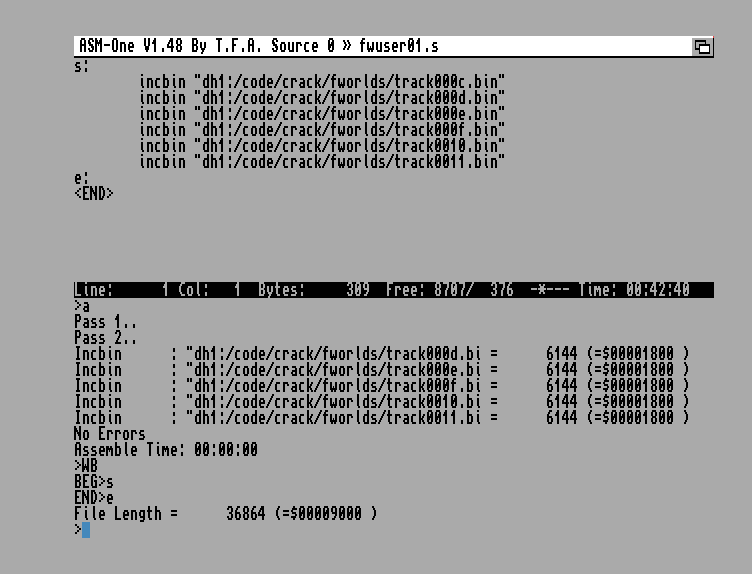
Remember that the argument in D1 (number of tracks to load) actually means numoftracks-1, so don’t forget to save the ‘extra’ track even if it’s not part of the filename!
Another thing to note is, if you’ve used the included MFMWarp usercode module, that certain tracks are missing in the dumped files…don’t worry this isn’t a bug, there is simply no sync/data on these tracks.
An exception to this is a specific protection on track 79, but I’ll let you worry about that one later (it’s trivial to remove the check)!
The first file is the loading pic, the second file (D1_000C_0005.BIN) is the main game executable. At this point you can either load this into ReSource and disassemble it (same way as we did with the bootblock), or take a shortcut and load it into memory using your AR cart:-
>>> lm D1_000C_0005.BIN,6a400
As soon as you disassemble the first few instructions @ $6A400, you should see the first 2 calls to the second loader:-
LEA $017C00,A1
MOVEQ #$13,D0
MOVEQ #$07,D1
BSR.W $0717DE
LEA $023C00,A1
MOVEQ #$1B,D0
MOVEQ #$04,D1
BSR.W $0717DE
The reason for loading it into memory with AR was simply to speed up the process of finding all calls to the loader in this piece of code… it took me some considerable time to get a complete labelled disassembly with ReSource that I could search for the loader label and find every call. Using AR, this can be performed in a few seconds:-
>>> fa 717de 6a400
In fact, Action Replay will find 26 calls(!) to the loader and scroll the early matches off the top of the screen before you can take notes! Because we need to disassemble every single call to the loader in order to discover the parameters (so that we know which dumped tracks from the warp to INCBIN together to create the files), you should probably do the same thing again with a shorter search range specified. Clear the screen (F1) and try it again in 2 steps:-
>>> fa 717de 6a400 6d000
…note down all the addresses, then…
>>> fa 717de 6d000
Now, remember when I said at the start this was *NOT* a full tutorial on how to crack this game? We’ve reached the point where I’m getting so far away from the subject matter (Warpers, remember?!), that I’m going to bring things to a close. I will leave you with a few pointers if you want to continue cracking this (or any other) game from warp files:-
1. Don’t skimp on understanding the disk format. While you may not require all the information in order to extract the files you want, it’s usually better to know more than less 🙂
2. Create a bootable ‘crack’ disk as soon as possible, with some error checking/trapping so that if a file is missing you can easily detect it. This can be as simple as restoring the registers as they were for the original loader call, and entering an infinite loop:-
FOREVER:
MOVE.W $DFF006,$DFF180
BRA.S FOREVER
When you see the flashing screen, break into AR and investigate.
3. Warps can actually be useful for discovering ‘longtrack’ protections – if you get a correct dump of tracks 0.0 to 78.1 and track 79 fails to save correctly, there is a good chance there is a custom track and related track 79 check routine that you must find & remove.
Happy New Year everyone, hope you have a good 2013 – stay Amiga!
-WK

Blup !
Oh my god, great.
Thks a lot
With my extremely limited (read: zero) knowledge of cracking games I didn’t even know what MFM warping was at all. Now I do! Good tutorial. Nice one WK. 🙂
Excellent and well written tutorial.
Great read, I always wondered how they got the real data from all that junk.