* TURRICAN II CRACK TUTORIAL *
Requirements
1. AMiGA or WINUAE
2. ACTION REPLAY freezer (or ROM Image)
3. Original Game or CAPS-Image
4. Powerpacker or XFD
5. Assembler (ASM-One / Trash-M One / Seka or similar)
6. Knowledge in using one of the above mentioned Assembler?s!
General Info
This tutorial will not really be good understandable for people who have never used
to work with an assembler or have never coded a single byte on their own… it?s
hard to write such an tutorial and it?s surely impossible to write this stuff so
that ?everybody? will understand it. For example I cannot start explaining what
an ?move? instruction is doin? or what e.g. the words ?offset? or ?filelookuptable?
mean and so on. Also this method of cracking the game is surely not the only one
but due to the fact that I want to write as less as possible about hardware-trackloading
I use the ?fileripping? method in this crack.
PART 1 – WHAT?S GOING ON?
Like in the other tutorials on this neat page we will try to make a copy of the Turrican
Original Disk at first and guess what…
it?s not really copyable ! 😉
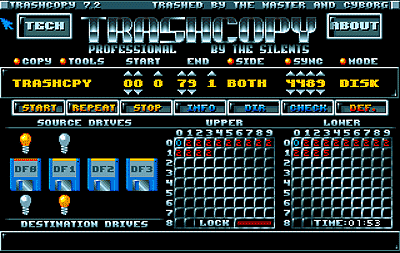
If we take a closer look onto the trashcopy screen we will recognize that this disk
either consists of a very large copylock (kidding) or it simply uses it?s own trackformat!
But however… you don?t need to be a clairvoyant to guess that the copy of this disk
will not work at all!
So let?s start with loading the first (and only dos-readable) track into memory to
have a look what?s going on …
Enter your AR and type in the following: rt 0 1 50000
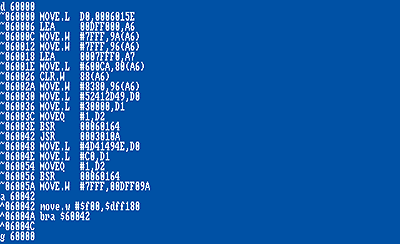
… let?s begin with disassembling the bootcode at $5000c, type: d 5000c and
scroll down like in the picture below.
The first interesting thing we can see here is very typical… from adress $50032-$50050
the trackdisk-device is used to read $800 bytes from disk-position $400 into memory
location $60000. In the last 2 instructions at $50080 / $50088 an exception
is caused and our little program is continued in memory at adress $60000. So
this will probably be one of the gameloaders!
Let?s save those datas to a disk at first, we will use them l8r on. So put a blank
one into df0: and save the stuff like this:
SM bootblock, 50000 50400
SM loader, 50400 50400+800
Let?s continue our work with disassembling the loadercode… we could disassemble
from adress $50400 now but due to the fact that we know the loader is located at $60000
we will load it into that position before we continue…
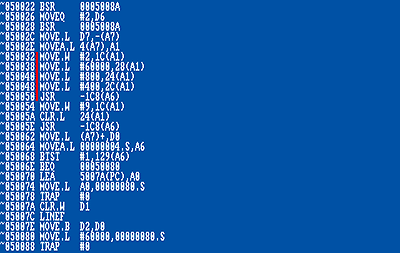
Type in: LM loader, 60000 … and start disassembling with d 60000 …
You will see something (no, exactly) this code:
The code begins with some standard stuff like killing all interrupts, pointing the
stack register to some memory location, setting up a copperlist and so on… But after
that i found some lines which really looked interesting to me… take a look at the
instructions at $60030. The longword-value $52412D49 is moved into d0, the value $30000.l
is moved into d1 (perhaps an memory adress?) and another parameter is moved into d2
($1) before calling the routine located at $60164. After returning from that subroutine
the program jumps to $3010A. Hmmm… $3010A?! Sounds similar to the value moved into
d1 ($30000) before we branched to $60164 … Let`s take a look onto the next 4 instructions
… again a value is moved into d0 ($4D41494E.l), another one into d1 ($c0.l) and
even d2 is again set to value $1. Well… if you continue disassembling some lines
(no picture included) you can see that the program continues execution at adress $C0
!!! $C0 ? Wasn`t that the value in d1 before we branched to $60164 the second time?
After having another bottle of beer I came to the point that $60164 seems to be some
kind of a loaderroutine which is called with 3 parameters. D1 could be the adress
where the loader is tracking to.. but what does the value in d0 mean?
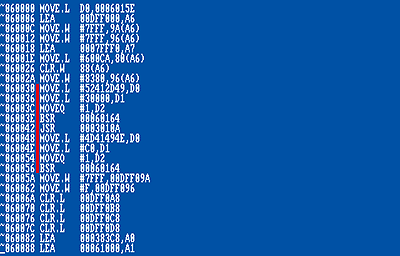
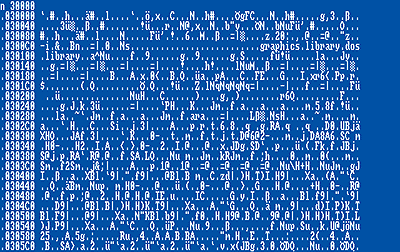
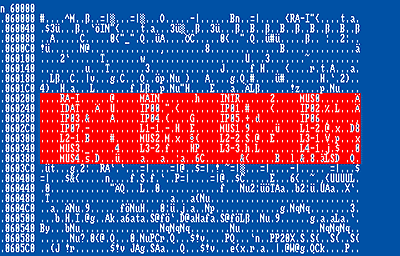
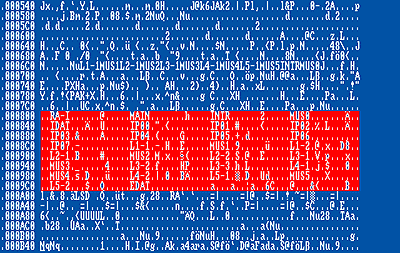
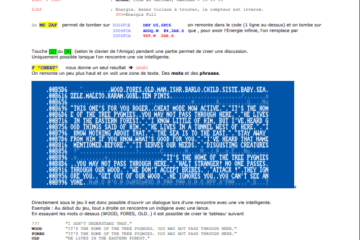
Lets view the loader memory at $60000 in ASCII… type: n 60000 and take
a deeper look!
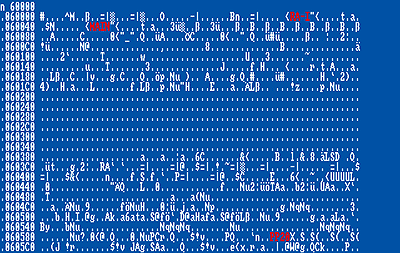
Again i?ve marked the interesting stuff in red …. we can see the three longword
value?s “RA-I”, “MAIN” and “PP20” (Powerpacker-Header?) which really looked interesting
to me and some hundred of bytes in between the code which is completely zero?ed!.
After checking how the two values “RA-I” and “MAIN” are included in the code i?ve
recognized that this is the stuff which is moved into d0 before our loader is called.
So the loadercode looks like this:
move.l #”RA-I”,d0
move.l #$30000,d1
moveq #1,d2
bsr $60164
jsr $3010a
move.l #”MAIN”,d0
move.l #$c0,d1
moveq #1,d2
bsr $60164
The value in d0 seems to be some kind of a filename…. but if so, the gameloader
must probably have some kind of a lookup-table somewhere which tells the trackloader
where those files are stored on disk, but while stepping through memory between $60000-$60800
I cannot really find something like this. Anyway… let?s try to rip those two files
at first and find out what the third parameter in d2 is all about… perhaps he is
tracking the lookup-table into memory when the loader is called the first time (guess
what, it is so!).
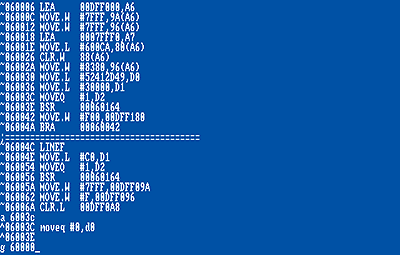
Insert your Original Turrican Disk now and let us do some patching in the loadercode
like this:
We will insert two lines after the code returns from the possible trackloading-routine
at adress $60042 which will set the screencolor to red in an neverending loop! So
type in the following:
a 60042
^60042 move.w #$f00,$dff180
^6004a bra $60042
and then… jump into the loadercode like this: g 60000 !!!
Yes…after some tracking the screen turns red and nothing happens at all… so the
trackloader has finished with the file and the processor seems to hang in our loop!
So enter AR to look what has happend… if the parameter in d1 ($30000) is really
an memoryadress we will perhaps see some code or anything there… let?s check it
out!
Type in: n 30000
That?s it… after stepping through the memory you are able to see that the loader
has really loaded some undecrunched data into memory… Now lets have some “learning
by doing” with the parameter given in d2!!! Instead of moving $1 into d2, let?s see
what the loader is doing if we clear that one!
Let?s disassemble the code again to find out where the “moveq #1,d2” instruction is
executed and replace it with an “moveq #0,d2” like this:
a 6003c
^6003c moveq #0,d2
^6003e
… and then jump to the loader again typing: g 60000
After some tracking we will see our red screen again which tells us to enter the AR
and take another look into memory at adress $30000.
Type in: n 30000 and see what happened now:
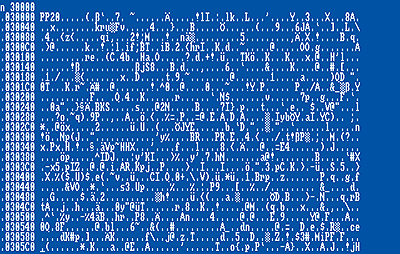
Yeah… the data begins with “PP20” which means that the loader just tracked in the
file without decrunching it. So the parameter in d2 seems to tell the loader if the
file is crunched with PP or if it?s either undecrunched or packed with anything else!
Now that we (hopefully) know how the loader works, let?s see what has happened to
our loadercode at $60000. We talked about some kind of a lookup-table some lines ago…
let?s see if something changed there.
Type in: n 60000
Wow…the region that was zero?ed before calling the trackloader has now been filled
up with some data. Let?s take a nearer look at those bytes…
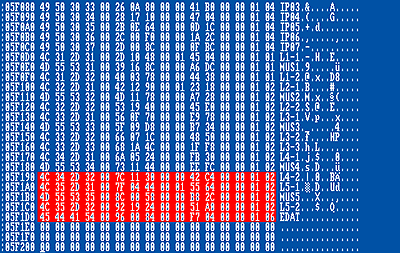
Type in: h 60204 and scroll down some lines…
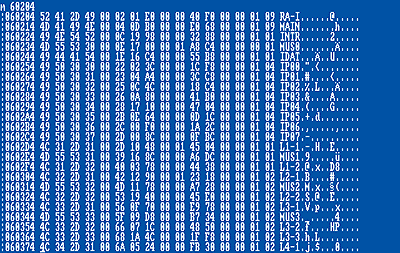
Yessss… this looks like a Lookup-Table to me, eh? It begins with the file “RA-I”
and ends up with the files “L4-1” and “MUS4”! (Remember the size of this filetable…
it?s !400 Bytes!!)
Well okay… let?s have a little break and think of what we know by now… We seem
to be able to rip those files stated in the lookup-table by calling the loading routine
and passing the filename in d0. But how do we know about the filesize?! Doesn?t that
value have to be included in the lookup-table as well and if so, which value is it?
There are a lot of numbers in between the filenames. So let?s go and find it out with
a little trick. We will call the loader again to track that “RA-I” file into memory
at adress $30000. But this time, we will fill up that memory-area with some “A” bytes
before, so when loading has finished, we can see how many bytes have been changed!”
Type in: o “A”, 30000 50000 (this fills up the memory from $30000 to $50000
with the given byte-value) and then do another jump to our loader routine with: g
60000.
After that fancy red-screen we enter our AR again and scroll down the lines from $30000
until we see those hundreds of “A” bytes… after checking where the first “A” appears
we notice a length of $40f0 bytes!!! Remember that value and take a look into the
filetable stored at $60204 again. STRIKE! Look at the longword-value at offset $8
from the start of the table. This must be the filesize. Lets try to load the “MAIN”
file into memory now to make sure that we?re right! So fill up the memory at $30000
with “A”?s again like stated before and then do the following …
Change the value which is moved into d0 from “RA-I” to “MAIN” at adress $60030!
Type in: n 60032 (we take adress $60032 coz the first 2 bytes are the “move.l”
instruction!!)
and replace the 4 bytes “RA-I” into “MAIN” and hit return so the the AR recognizes
our little change! Remember to write “MAIN” and not “main” or “Main”, coz otherwise
the loader won?t find the file in the lookup-table! Continue with jumping to our loader
again with typing g 60000 !!! Now after some more tracking the screen turns
red again and we know that loading has finished. Now scroll down the memory at $30000
(“MAIN” also seems to be powerpacked!) until you reach our with “A”?s filled up area.
Remember the length of the filedata (which should be $e068 bytes) and compare it with
the value in the lookup-table!!! WE WERE RIGHT!!! It?s the same!
Well… we could start with ripping off all files from the Original Disk now but i
won?t !! 😉 Now that we know a lot about how the loader is working, we will first
boot the game up just to check what the “MAIN” file is doing after being loaded into
memory at $c0! Due to the fact that we have to put those files back onto a disk lateron
and we will have to write our own trackloader it might be interesting to see how many
of these loaders the game consists of coz we have to patch them all!
Okay reset your machine, put in the Original Disk and load it up… when the Rainbow
Arts Intro is finished and the game continues tracking some data from disk just enter
your AR and let?s disassemble the code at adress $c0 where the “MAIN” file should
be located. The first instruction is a branch to another memory adress ($123e, picture
not included) so let?s continue disassembling from adress $123e with d $123e…
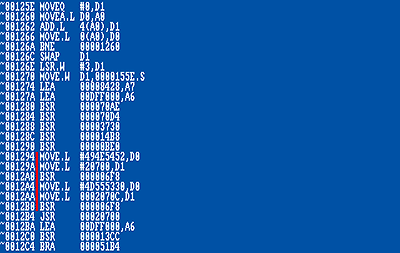
Now in these few lines of code you will see something familar… from adress $1294
on another routine is called 2 times with a branch to $6f8 which seems to take
the same parameters as our first loader that we?ve been in before! That?s nice coz
we only need to code one new trackloader then for both the loader at $60000 and the
one located somewhere in the “MAIN” file. Before we go deeper into the trackloader
let?s have a short view into the memory at $c0 in ASCII just to see if there is another
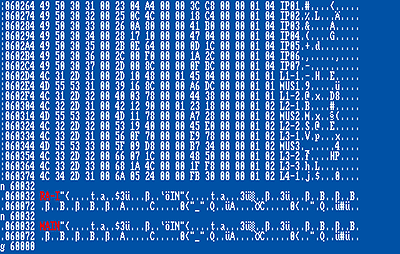
lookup-table or if the old one on $60204 is used! Type n c0 and scoll down
some lines.
As we can see there is something interesting starting at adress $802. This
is our lookup-table that we?ve seen before. But if you scroll down some more lines
you will recognize that this table seems to be complete because it doesn?t end with
“L4-1” and “MUS4” but with “L5-2” and “EDAT” which probably means the END-DATA! So
let us continue with saving this complete lookup-table to disk for later use like
this:
SM filelist, 802 9e2.
Remember the size of this complete filelist also, it?s !480 Bytes!
After some testing i came to the point that this loader located at $6f8 is
the only one that the game is using up to the end. So let us come to something easy
now… As we know all the filenames we can continue our little crack with ripping
all the files from the disk… I will use the first loader for that so reset your
machine, insert your savedisk and load our file called “loader” which we saved at
the beginning of this tutorial to adress $60000 again with typing LM loader, 60000
! Now you are over some fun for the next hour with ripping all the files to disk …
if you are a coder you could program some lines that will rip all the files automatically
but i won?t explain that now coz i guess this tutorial is getting large enough!
PART 2 – THE FILE RIPPING PART
Okay mate… now that you have the original loader file at adress $60000 again the
things are getting interesting!
As we know, the first loader has an incomplete lookup-table for the files, so after
ripping everything up to “L4-1” and “MUS4” we will have to overwrite some of those
filenames with the remaining ones including all the data like filelength and so on…
Let?s begin with patching the loaderfile like we did in the beginning of this tutorial!
IMPORTANT: The files on disk are stored in the order as they appear in the
lookup-table! I had some problems with ripping the data by taking the filename from
the lookup-table in a random order. It?s not really possible to rip the “L4-1” data
and then rip the “RA-I” file which stands at the beginning of the filetable ! It will
make the things easier for you if you take a piece of paper and then write down every
single filename in the correct order including the filelength! This loader really
doesn?t like to step backwards to the previous file as i found out! 😉 So let?s get
things started with patching our loader a second time:
a 60042
^60042 move.w #$f00,$dff180
^6004a bra $60042
This will let the processor hang in our “Redscreen-Routine” again after tracking
the filedata into memory. Now let?s continue with ripping the files from “RA-I” up
to “MUS4” which is the last entry in our (incomplete) lookup-table.
(Remember to have a second formatted disk ready coz we won?t come out with only one!)
So first of all let?s overwrite the “moveq #1,d2” before the loader is called into
“moveq #0,d2” again coz we want to get the stuff as it is stored on disk and not undecrunched
or something.
a 6003c
^6003c moveq #0,d2
^6003e
If you don?t want to make these patches again and again if the computer should crash
during our ripping-action you could save this patched loader as “loaderp” or something
similar to your disk and reload this one instead of the unpatched one! So, due to
the fact that the “RA-I” file is the first one to load we don?t need to do anything
more now than just jumping into our loadercode at $60000 with g 60000 and have
a wait until the redscreen appears. Enter your AR again and save the stuff out with:
SM ra-i, 30000 340f0 coz we know the length of each file now (lookup-table
offset +$8 for each entry).
REMEMBER TO CHANGE THE DISKS BEFORE SAVING THE FILE AND AGAIN BEFORE TRACKING THE
NEXT FILE FROM THE ORIGINAL DISK!
Now it?s time to change the filename which is moved into d0 at adress $60030
before the loader is called!
Type in: n $60032 (remember the 2 bytes at $60030 is our “move.l” instruction!)
and overwrite the “RA-I” longword with the next one in our lookup-table, which is
“MAIN” and hit return! What you do from now on is always the same:
1. Insert your Original disk again!!!
2. Jump into the loadercode using g 60000!
3. Insert your savedisk!!!
4. Save the file with SM filename, $30000 $30000+filesize
5. Change the filename which is moved into d0 with n 60032 and typing in the
new filename + return!
… Step to Point 1 !!!
Note: If your computer should crash for example at file “L1-1” or something
then you don?t need to begin from file “RA-I” after resetting your machine. Just load
in the patched loader again and start with the last file you?ve read in… then continue
with the next one in the table and so on!
Loop this until you?ve ripped the file called “MUS4” which is the last entry on our
filetable at $60204. To get in touch with the last files which are “L4-2”, “L5-1”,
“MUS5”, “L5-2” and “EDAT” we will copy the last 5 filedatas from the complete filetable
on disk into the one we are using at the moment at adress $60204. We can overwrite
the first 5 datas without getting troubles because we have already ripped them so
insert your savedisk and type in….
LM filelist, 5f000 and scroll down to the end using…
m 5f000. You will see something like this…
Then let?s copy the memoryblock with the last 5 filedatas into our current used lookup-table
at adress $60204 like this:
trans 5f190 5f1e0 60204
Now you can continue ripping the last files from “L4-2” to “EDAT” like you?ve done
before….
… so now… CONGRATULATIONS!!! We can put the Original-Disk back into it?s
case … we won?t need it anymore!
Note: To make things easier for you at the end of this tutorial it would be
a good idea to create an directory on your harddisk (you own one, do you?) and copy
all the files into it…!
PART 3 – UNDERSTANDING THE TRACKLOADING ROUTINE
Now for some coding stuff… due to the fact that we will have to put those files
back to disk in the near future and we?ll have to code an own trackloader it is neccessary
that we understand how the trackloader on Turrican II works …. As we?ve seen in
the beginning of the tutorial there are 3 parameters given from d0-d2 before the ?so
called? loader is being jumped to! As we know the third parameter in d2 has something
to do with uncrunching or something, so the routine at $60164 is not only the pure
trackloader … it even seems to consist of another routine which is able to unpack
the tracked datas. We ripped the files in crunched format so we will still need this
unpacking routine for our files… so let?s find out where the ?real? trackloader
starts and what kind of parameters it will need 2 work. Let?s disassemble our loader
from $60164 with d 60164 and scroll down some lines…
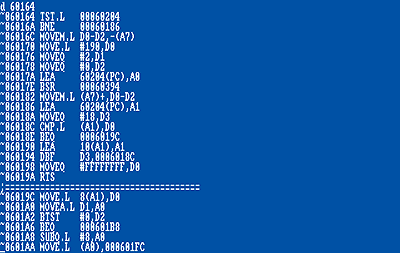
———————————————————————————————–
$60164 TST.L $60204 ; Is the lookup-table already loaded?
$6016A BNE $60186 ; Yep… continue.
$6016C …
$60170 …
$60176 Not neccessary for us… branching to a routine that seems to set up the lookup-table
$60178 to adress $60204!
$6017A …
$6017E …
$60182 ….
$60186 LEA $60204(PC), A1 ; Store adress of our filetable in A1.
$6018A MOVEQ #$18, D3 ; How many files are stored in the lookup-table.
$6018C CMP.L (A1), D0 ; Compare the filename given in D0 with the lookup-table entry.
$6018E BEQ $6019C ; Found the file… Continue code at $6019C (A1 now points to the
correct entry in the filetable)
$60190 LEA $10(A1), A1 ; Let the filetable point onto the next entry!
$60194 DBF D3, $6018C ; Continue searching until d3 gets -1 !!!
$60198 MOVEQ #$-1, D0 ; Errorcode in D0 -> File not found! 😉
$6019A RTS ; Get back to where we came from!
———————————————————————————————–
$6019C MOVE.L 8(A1), D0 ; Remember Offset $8 ? -> Move?s filelength into D0.
$601A0 MOVE.L D1, A0 ; Remember D1 ? -> Puts our ?where to load to? adress into A0.
$601A2 BTST #$0, D2 ; Remember our Crunchparameter D2 ? -> Testing Bit 0 ?
$601A6 BEQ.B $601B8 ; Zero… no need to unpack… continue at $601B8
$601A8 SUBQ.L #$8, A0 ; Well… our ?where to load adress? is getting sub?ed by 8!
😉
$601AA MOVE.L (A0), $601FC ; Save the 8 Bytes before ?real? loading adress… this
seems to set up 8 Bytes
$601B0 MOVE.L 4(a0), $60200 ; for the “PP20” header (4 Byte) including the depacked
filelength (4 Byte)
$601B8 MOVEM.L D1-D2/A0-A1, -(A7) ; Save neccessary regs on stack.
NOW OPEN YOUR EYES… THE INTERESTING 4 INSTRUCTIONS COMING UP!
(Remember A1 points to lookup-table!!!)
$601BC MOVE.W 4(A1), D1 ; The word-value located at filetableoffset+4 into d1.
$601C0 MOVE.W 6(A1), D2 ; The word-value located at filetableoffset+6 into d2.
$601C4 EXT.L D2 ; Enlarge d2 to longword.
$601C6 BSR.W $60394 ; Guess what !!! This is the trackloader!
$601CA …
———————————————————————————————–
Well… now there is nothing more we need to know about the trackloader.
It is located at Adress $60394 and is given the following parameters:
D0.L -> LENGTH OF THE FILE.
D1.W -> WORD VALUE STORED AT FILETABLE OFFSET +$4
D2.W -> WORD VALUE STORED AT FILETABLE OFFSET +$6 (enlarged to longword)
A0.l -> MEMORYADRESS
The registers in d1 and d2 are surely used to tell the loader where the file is located
on disk.
Something like “D1 = TRACK NUMBER” and “D2 = OFFSET FROM BEGINNING OF THE TRACK” !!!
The same code as stated above is used in “MAIN” as well… the trackloader begins
in memory at adress $9e2 and of course, takes the same parameters! I think there is
no need to show any pictures for that one!
But we won?t bother with that any longer … next Part will be saving the ripped files
onto a normal dos disk using the trackdisk-device and making some changes into the
file-lookuptable. As you may have guessed we cannot place the files into the locations
that were used on the original disk because we won?t get the same amount of data-bytes
written on a ?dos-track? as on the Turrican Gamedisk. Next part is coming up…
PART 4 – CREATING THE DISK-IMAGE
Everything in this part is made using (in my case) the ASM-One Assembler…
If you have added the filelength of each file you might have recognized that we won?t
come up with one disk… so on the first disk we will store the files “RA-I” up to
“L3-3” so that you have to swap the disks before the game begins with Level 4 ! To
tell the loader on which disk the current file belongs to, we will use the tracknumbers
from 0-159 for disk 1 and 160-xxx for disk 2 in the filetable (a disk consists of
160 tracks, numbered from 0 – 159).
So before we are going to make the disk-image we still have one thing forgotten…
we know that there is a seperate loader in the “MAIN” File which we also have to patch
l8r on…. as we saved the file “MAIN” in powerpacked format we will have to decrunch
it first and then write it to our disk uncrunched, so it will make the forthcoming
patching easier for us (and for the trainermakers hehe)… So let?s unpack the file
either using the Powerpacker or XFD or something and write the unpacked file (!132568
bytes) back to (one of) yor savedisk(s), overwriting the old “MAIN” file which is
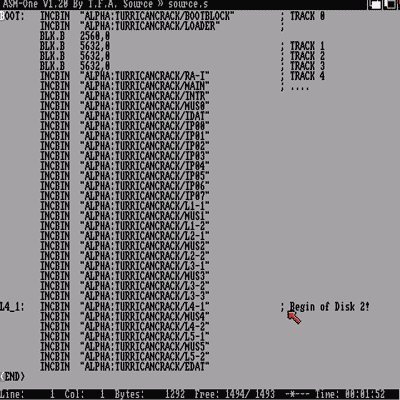
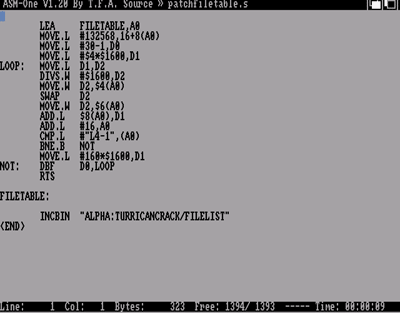
not needed anymore in packed form! Now it?s time to start your Assembler, in this
case ASM-One, and let?s begin to write the diskimage!
Reserve some ram, change into the editor-mode using -ESC- and type in the following:
(of course you have to change the pathname to the point where you?ve saved the files
to…!)
If you don?t have enough ram in your machine you will have to write the diskimages
in 2 steps lateron (Part 6)…. also if you are not an owner of a harddisk (I can?t
believe it) and you still have the files stored on 2 disks you will have to do this
also (perhaps not with using a second drive)…. I guess I don?t have to explain that
to you!
First of all we include the bootblock (!1024 bytes) followed by the first loader (!2048
bytes). Then we fill up the remaining !2560 bytes of track 0 (a track has a size of
!5632 –$1600- bytes!) with zero?s! Then we insert three empty tracks for a nice cracktro,
followed by the gamefiles as they appear in the lookup-table. We will save all the
data to disk later on using ASM-One?s “wt” (Write Track) command…
If you have finished with the diskimage we can begin to overwrite the original values
in the filetable with our trackpositions on our crackdisk. Leave the Editor using
-ESC- again and save the diskimage-sourcecode to your disk using the -w-
command, naming it for example “image”.
We will kill the source now using -ZS- (Zap Source) to begin our small filetablepatcher-code…
we will program a few instructions that will fill up the lookup-table automatically
with the correct values…. so change into the editor again (i guess you know which
key to press now) and type:
(And again don?t forget to change the path of the filetable… explanation follows!)
The second instruction is really important, due to the fact that we unpacked the main
file we have to write the new filesize, which is !132568 ($205D8) bytes, into the
filetable (each entry is !16 bytes, so the offset to the filelength of “MAIN”, which
is the second file in the table, is offset !16 + !8)!!!
In the maincode a bytecounter in d1 is used which stores the position of the actual
gamefile on disk as bytevalue. We start with “RA-I” on track 4 which means at the
disk-position 4*$1600 (remember a track has the size of $1600 bytes). Then the bytecounter
is divided with $1600 to get the current track number of the file (in the first loop
-4- of course) and stores it in the filetable… then we swap that value to get the
rest of our division which in fact is the byteoffset to the file on the track (-0-
in the first loop) !! Now the filelength of the actual file ($40f0 in the first loop)
is added to the value of our bytecounter in d1, changing it to 4*$1600+$40f0 then.
Finally we point a0 to the next entry of our filetable and start the same act again
until we get to the end of the filetable. If the file “L4-1” is reached, the bytecounter
is set to “160*$1600″ because from now on the files belong to disk 2, starting at
track 0 again! Our own loader will check the trackposition lateron and if it?s larger
than 159 it will make the screen flash so that the user knows the disk has to be changed
(of course the other way round as well, if disk 2 is placed in drive and disk 1 is
needed!).
Okay, if you understood that stuff, leave the editor-mode with -ESC- and let?s
assemble the whole thing.
Type in: A and hit return…
If you typed everything in correct form and you don?t see any error-messages, start
the code with J and hit return!
Now our filetable should be patched… check it out with typing H filetable
and hit return. Now your values in the filetable should look like this:

If you see the same on your screen then save the patched filetable to disk, naming
it for example “filetablepatched”!
PART 5 – PATCHING LOADER AND “MAIN” FILE
Some general notes:
In this tutorial I won?t explain how hardware-trackloading is being programmed or
how datas are stored on mfm encoded disks, because this is a ?how to crack Turrican
2? and not a ?how to code a hardware-trackloader? tutorial. Our loader will have to
work with the same parameters given in the same registers as the original loader did,
so our trackloading routine will also work with the following parameters:
D0.l = Bytes to read
D1.w = Tracknumber (where the start of the actual filedata is located in!)
D2.l = Byteoffset (the byteoffset, where our file starts on the track)
A0.l = Memory Loadadress
Well… you won?t understand the next few lines of code if you have never programmed
a hardware trackloader… I?ll post it here anyway so you can copy and paste it into
your sourcecode…. I will not show any screenshots here because guess what, you cannot
copy and paste out of a picture hehe… By the way: This loader is a ?trackgrinding?
one coz it will always step back to track 0 and then walk up to the track where the
current file is on! Njoy the sound! 😉
; =================================
; Trackloader for Turrican 2.
; D0.l = Bytes to read
; D1.w = Tracknumber
; D2.l = Trackoffset
; A0.l = Buffer to read
; A6.l = $dff000
;==================================
trload:
lea diskstatus(pc),a4
cmp.w #160,d1
blt.b disk1
disk2:
sub.w #160,d1
tst.b (a4)
bne.b crdisk
move.b #1,(a4)
bra.b flash
disk1:
tst.b (a4)
beq.b crdisk
move.b #0,(a4)
flash:
move.w d5,$180(a6)
subq.w #1,d5
btst #6,$bfe001
bne.b flash
crdisk:
lea $bfd100,a4
lea bytecounter(pc),a2
lea kopfstatus(pc),a3
move.l #0,(a2)
move.b #0,(a3)
move.b #%01111101,(a4)
nop
nop
move.b #%01110101,(a4)
bsr.w diskok
add.l d2,d0
mvzero:
btst #4,$bfe001
beq.b trzero
bset #1,(a4)
bsr.w movehd
bsr.w delay
bra.w mvzero
trzero:
bsr.w diskok
moveq #0,d3
move.b d1,d3
divs.w #2,d3
move.l d3,d1
swap d1
cmp.w #0,d1
beq.b headd
bclr #2,(a4)
bsr.w delay
move.b #1,(a3)
bra.b mvzyl
headd:
bset #2,(a4)
bsr.w delay
move.b #0,(a3)
mvzyl:
cmp.b #0,d3
beq.b zylok
moveit:
bsr.w delay
bclr #1,(a4)
bsr.w movehd
dbf d3,mvzyl
zylok:
bsr.w diskok
bsr.w readtr
bra.w decode
trdone:
cmp.b #1,(a3)
bne.b headup
bset #2,(a4)
move.b #0,(a3)
moveq #1,d3
bra.b moveit
bclr #1,(a4)
bsr.w movehd
bsr.w delay
bra.b zylok
headup:
bclr #2,(a4)
move.b #1,(a3)
bra.w zylok
ready:
bsr.w delay
move.b #%11111101,(a4)
nop
nop
move.b #%11100111,(a4)
rts
diskok:
btst #5,$bfe001
bne.b diskok
rts
readtr:
move.w #$2,$9c(a6)
move.w #$8210,$96(a6)
clr.w $24(a6)
move.l #$74000,$20(a6)
move.w #$4489,$7e(a6)
move.w #%0111111100000000,$9e(a6)
move.w #%1001010100000000,$9e(a6)
move.w #$9900,$24(a6)
move.w #$9900,$24(a6)
dwait:
btst #1,$1f(a6)
beq.b dwait
clr.w $24(a6)
rts
movehd:
bclr #0,(a4)
nop
nop
nop
bset #0,(a4)
rts
delay:
move.w #$4000,d4
wait:
dbra d4,wait
rts
decode:
move.l #$55555555,d4
moveq #0,d5
dec:
lea $74000,a1
ssync:
cmp.w #$4489,(a1)+
bne.b ssync
cmp.w #$4489,(a1)
beq.b ssync
move.l (a1),d3
move.l 4(a1),d1
and.l d4,d3
and.l d4,d1
asl.l #1,d3
or.l d1,d3
ror.l #8,d3
cmp.b d5,d3
beq.b bfound
add.l #1086,a1
bra.b ssync
bfound:
add.l #56,a1
move.l #(512/4)-1,d6
decbl:
move.l 512(a1),d1
move.l (a1)+,d3
and.l d4,d3
and.l d4,d1
asl.l #1,d3
or.l d1,d3
cmp.l (a2),d2
bgt.b ofschk
move.l d3,(a0)+
ofschk:
addq.l #4,(a2)
cmp.l (a2),d0
ble.w ready
dbra d6,decbl
cmp.b #10,d5
beq.w trdone
addq.b #1,d5
bra.w dec
bytecounter: dc.l 0
kopfstatus: dc.b 0
diskstatus: dc.b 0
trloadend:
Now if you are ready with typing in (or ?pasting?) the sourcecode do the following:
Assemble the stuff using -a- and return.
Save the trackloader to disk as binary using -wb-, naming it for example “trackloader”,
and save from label “trload” – “trloadend” which are exactly 484 ($1e4) bytes at all.
Now (don?t forget to save the sourcecode) it?s time to patch our two files “loader”
and “MAIN” with the new filetable and the new trackloading routine…
Let?s use the AR for our patching-action again so enter your cartridge NOW!
We?ll start with the loader, type in LM loader, $50000 and hit return.
We know that the lookuptable is stored at adress $60204 in memory, so the offset to
the beginning of our loaderroutine is $204. So let?s load up our patched filetable
to e.g. adress $45000 and then copy it into the loadercode!
Enter: LM filetablepatched, $45000
Now transfer the first 400 bytes of it into the correct position (we only take the
first 400 bytes because as we know the lookuptable in the loader was not complete
and copying all the 480 bytes would overwrite a bit of our trackloader that is located
at the end of the filetable!)
Enter: trans $45000 $45000+!400 $50204 !
Now we have to do the same with the trackloading routine. As seen in one of the previous
parts, the trackloader starts at $60394, which means that the offset to loaderstart
is $394.
So let?s load up the trackloader as well, we will take adress $46000 for it!
Enter: LM trackloader, $46000 and copy it into the loader using…
trans $46000 $46000+!484 $50394
(If cracking other games you will of course always have to check the length of
the original and of your new coded trackloader so if your new one is larger you will
get some problems with simply ?overwriting? the old one hehe!)
Before writing the patched loader back to disk now we may not forget to change the
parameter in d2 before the loader is trying to catch the “MAIN” file to #0
because we will write the “MAIN” file uncrunched to disk… so if we would
leave the “moveq #1,d2” back in the code, the loader would try to unpack an unpacked
file which would cause the game to crash! So let?s change that instruction now…
Enter: a 50054 and insert an “moveq #0,d2” followed by -enter-!
Now we are ready to write the patched loader to our disk again with typing:
SM loader, $50000 $50000+!2048
Okee, now for the same patching action with the “MAIN” file. Load it in with:
LM main, $50000
We know that the lookuptable is stored at adress $802 in memory, so the offset to
the beginning of main is $742 ($802-$c0).
Let?s copy in the complete lookuptable now with:
trans $45000 $45000+!480 $50742
Now the same again for the trackloader which is in memory at adress $9e2, so the offset
to the startadress of main is: $922 ($9e2-$c0).
Enter: trans $46000 $46000+!484 $50922
Now finally we got “MAIN” patched as well… but before saving it we?ll have to patch
2 other things that i didn?t explain before! 😉
The game is ?loading? and ?saving? the highscores which will make the game crash if
not finding the original trackformat on our crack… there are two simple ?branches?
which we have to remove so that this doesn?t happen anymore. There is no deeper explanation
of how I found those branches because there was no special way of finding it… sometimes
you can spend hours with searching for such jumps! 😉 You will find those 2 bastards
here:
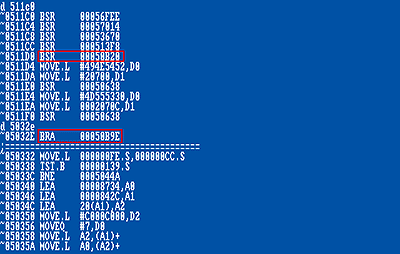
So let?s ?nop-out? the first, and ?rts-out? the second one like this:
A $511D0
^511d0 nop
^511d2 nop
^511d4
… and finally …
A $5032e
^5032e rts
^50330
Let?s save the file back to disk now using:
SM main, $50000 $50000+!132568
PART 6 – WRITING THE DISK-IMAGE(S)
Reset your amiga now, load the Assembler, reserve about 1,2 megs of ram (coz we load
the whole files to memory in one turn) and let?s write the crack to disk!
Load your Image-Sourcecode into the editor using the R command and let?s assemble
the stuff, as always using A !
After an error-free assembling (hopefully), insert a new blank disk into drive 0:,
typing in as followed:
-WT-… and tell him to write from memory position “BOOT:”, beginning
on track 0 up to 144!
(Well, we are writing less than 160 tracks coz the disk is not full at all…)
When diskaccess is ready, insert second disk and type in like this:
-WT-… then tell him to write from memory position “L4_1:”, beginning
on track 0 up to 67!
So after the second disk has finished tracking… Insert Disk One again, reset & enjoy
(not) !
At last some greetings to the best trainermaker on da earth: SIRIaX! …
and to the last cool Demogroup on Amiga, *cREATiVE MiNDs* ! 🙂
*** Alpha One ?2004. ***
They are right there YOU OLD MAN!! eye sight is going 😛
pictures Fixed.
Hummmmm.
Again no more pictures.
Fixed
Where are the pictures ? ;P
I remember copying this game on my A500+ with this software: Blitz Copy. I get it with my external drive from Power Computing.
This drive has a swith on its back, with a "copy" position.
The copy was pretty long, but it worked. And of course the copy wasn’t protection free.
I think it was a sort of "1:1" copier, like CloneCD on PC.
well done but the ripped files are still compressed…is it possible to decrunch them in anyway..??
The routine named delay uses an empty dbra loop: delay: move.w #$4000,d4 wait: dbra d4,wait rts On Amigas with a fast CPU, the loop will execute in the cache and may execute almost instantly. This potentially means the delay isn’t long enough for the heads to have stepped a track so you may load data from the wrong track causing the game to malfunction or crash. You need to wait at least 3ms to guarantee the heads have had enough time to step a track. You can perform the wait with the vertical beam position or using the CIA timers.… Read more »
Great tutorial, everything explained! Even an amiga cracking n00b like me can follow it 🙂 Thanks Alpha1.
thanks for the tut alpha_one, can’t wait to work it through until i got some time, after my army service.
Awesome tutorial! Thanks for that! :love: