For this tutorial you will need the following
1. Flash CS4
2. Winuae + GFXRIP find it here
3. The original Angels exe file Find it here
Ripping the font
—————————–
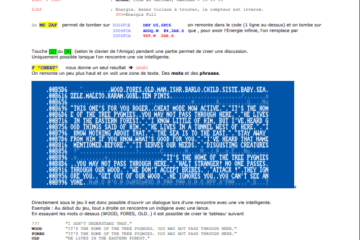
The first thing we need to do is open Winuae and load up the Angels file.
Once the intro is running you should see this screen

The next thing we want to do is create a Winuae SaveState file. To do this we need to bring up the Winuae GUI (F12)
On the left menu click on MISC and then click on SAVE STATE

Then from the drop down menu select Uncompressed (.uss)

Once we have the save state we need to open it up in GFXRIP
After you have loaded the SAVESTATE with gfx rip you should see something that looks like this

At the top we have our width and height and the amount of bitplanes the image needs.
GFXRIP
——
KEYS NEEDED TO FIND OUR FONT
————————————————-
U key:
This will open up a zoom window, so we will be able to see things better.
Q/A keys:
These keys control the width of our image (not needed in this tut)
W/S keys
These keys control the height of our image
E/D keys
These keys control the bitplane depth of our image (how many colours)
Up/Down/Left/Right keys:
These keys will move our image around. If you use these keys with the shift key then you will move around at a much faster rate.
L key:
Search for Amiga Palette
————————————————-
Why don’t we try a few of these keys out.
Press U to bring up our little zoom window to help us search better. Then press DOWN + SHIFT to scroll down until we see something recognisable.

This looks like our font! If you look closely you can also see bits of the HORSE LOGO.
Move the keys around until you have the A letter of the font on the left hand side. I can see 3 layers to the font image, so set the bitplane number to 3, and then adjust the Y value until the font starts to look something like this.
X320 Y128 Bit3

Now time to find the correct palette.
Press L to do a search

WOOO with the first try it found the correct palette!!!
To save our image we need to press P. Save our font as ANGELSFONT
And that is one quick way to rip a nice colour font!
Creating the flash file
——————————-
Open flash and a new AS3 file and set the file properties like the image below

Next we want to create a new BITMAPDATA canvas to use as our screen, to do this we go to frame 1 and open the ACTION window and type this.
var myBitmapData:BitmapData = new BitmapData(320+40,25,false,0x00000000);
var myBitmap:Bitmap = new Bitmap(myBitmapData);
this.addChild(myBitmap);
We just created a bitmap canvas that is 320+40px wide and 25px in height and with a nice black background (0x00000000)
Then we just added it to the main stage. You can test it by compiling and running the flash file. What you should see is a black screen 320+40 x 25 😛
Now we need to add the font graphic to the library so we can use it with our code.

FILE > IMPORT > IMPORT TO LIBRARY
Once this file is in your library, right click it and select properties

Click export for action script and give it a name of angelsfont. Click OK and close the properties window.
Now we want to tell our code the name of the font file we have just loaded into the library. Return to the action window and add this below our bitmap code
var fontdata:angelsfont = new angelsfont(0, 0);
Next we are going to need some text to scroll. Let’s try something simple like HELLO WORLD!
var text="HELLO WORLD! ";
As with our previous tutorial we need to create some VARS
var getcharcode=0
//This will hold our charcode
var fwidth=32
//This is the width of every char
var fheight=25
//This is the height of every char
var fontypos=0
//because our font is on more than 1 row we need to add this to tell the code where the Get Font Y Pos should point to
var charpos=0
// Where the current letter is
var speed=2
//How fast we want our scrolly to scroll
var waiter=0
//How long to wait before we blit another char onto our scroll screen
The next thing we want to do is create a loop and a listener for that loop
addEventListener(Event.ENTER_FRAME, mover);
//Tell flash to listen out for our enterframe loop
function mover(e:Event):void {
}
//Create our loop
Once all that is setup we need to put some code inside our loop.
waiter+=speed;
//increase our waiter time
myBitmapData.scroll(-speed,0);
//scroll our bitmap screen to the left | .scroll(x,y)
This will create a conveyor belt effect so it will always scroll and whatever we drop onto it will scroll in the direction we set earlier.
Next we want to create a waiter condition. We will use this to only drop our next char when the scroll has reached the char width
if (waiter==fwidth) {
}
Inside this condition we want to place the rest of our code
getcharcode=text.charCodeAt(charpos);
getcharcode-=65;
//get the char code and then minus the getcharcode by 65 because now the chars start at A and not space
This is going to create some problems because the font is not strictly in ASCII order so we will be okish for A – Z but the rest of our chars are a bit all over the place.
There are 2 ways to fix this.
1. create a table of all the letters as they appear in the font "A-Z!?:;0-9"(),-.’ ". Then create a loop that will loop through this table and search for our char and return a new X/Y for us to copy from
or
2. Do A-Z in the old ASCII way and add the position of the other chars manually.
In this tutorial I am going with option 2. Mainly because FLASH is not the fastest beast on the block and adding loops all over the place will just slow it down even more.
So add this to our next line
(study it if you want to know how it finds each char in our bitmap font)
		if (getcharcode==-32){//"!"
			fontypos=2
			getcharcode=6
		}
		if (getcharcode==-2){//"?"
			fontypos=2
			getcharcode=7
		}
		if (getcharcode==-7){//":"
			fontypos=2
			getcharcode=8
		}
		if (getcharcode==-6){//";"
			fontypos=2
			getcharcode=9
		}

		if (getcharcode>-18&&getcharcode<-7) {//"0123456789"
			fontypos=3;
			getcharcode+=17;


		}
		if (getcharcode>9&&getcharcode<20) {//"K-T"
			fontypos=1;
			getcharcode-=10;
		}
		if (getcharcode>19&&getcharcode<29) {//"U-Z"
			fontypos=2;
			getcharcode-=20;
		}

		if (getcharcode==-31){//"""
			fontypos=4
			getcharcode=0
		}

		if (getcharcode==-25){//"("
			fontypos=4
			getcharcode=1
		}

		if (getcharcode==-24){//")"
			fontypos=4
			getcharcode=2
		}

		if (getcharcode==-21){//","
			fontypos=4
			getcharcode=3
		}

		if (getcharcode==-20){//"-"
			fontypos=4
			getcharcode=4
		}

		if (getcharcode==-19){//"."
			fontypos=4
			getcharcode=5
		}

		if (getcharcode==-26){//"'"
			fontypos=4
			getcharcode=6
		}

		if (getcharcode==-33){//" "
			fontypos=4
			getcharcode=7
		}
Now we have the data needed to put a char onto our scrolling bitmap screen.
myBitmapData.copyPixels(fontdata, new Rectangle(fwidth*getcharcode,fheight*fontypos, fwidth, fheight), new Point(320,0));
//Copy our char to our scrolly screen and place it at X320 (off screen, this is why we made our bitmap bigger than 320) so it will scroll from right to left.
Next line
charpos++;
//get the next char
next line
if (charpos>text.length-1) {
charpos=0;
}
//restart our text if we reach the end.
fontypos=0;
waiter=0;
//reset the fontypos and waiter counter
This is what you should end up with
Great article thanks.
Hello i’m beginner in actionscript,
it is possible to load my text file via xml ? (var text="HELLO WORLD! ";)
Thank you for your tutorial, i continue to learn from other
Thank you musashi9 for the quick response , it works now 🙂 …greetZ
If you image font is in ascii order and on 1 line only, then you don’t need any of this "(if (getcharcode==-32) ,… ,ect ). "
Hi , Thank you very interesting …
I do not understand the party with characters ->(if (getcharcode==-32) ,… ,ect ).
my image font is in the order ascii
greetz
Great M9!!!
I would be even interested to see how the entire thing works .. including Stars, logo & mirror effect … but let s start with the sine at first .. 😀
Great and detailed tutorial.. and interesting even for us who in general loathe flash (except in flashtro.com and sieni.us) 😀
Go for the sinusscroller!
Nice one, I vote for the sinescroll tut! 🙂