DELIVERANCE (c) 21st Century
Entertainment
Requirements
1. AMiGA or WINUAE (Configuration: 2MB CHIP!!!)
2. ACTION REPLAY freezer (or ROM Image)
3. Original Game or CAPS-Images (2 disks)
4. Assembler (ASM-One / Trash-M One / Seka or similar)
Welcome back to another MFM-Tutorial … Deliverance is a 2 disk
game with a special trackformat of $18A0 bytes each track.
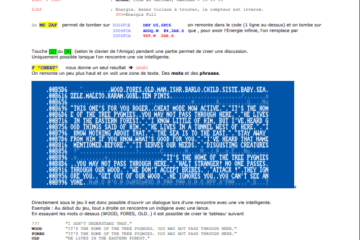
The lookuptable which holds all the informations about the filepositions on
these disks is stored directly in the bootblock at offset $200.
To have a quick look onto the filetable let?s read in the first track of disk 1
using our beloved Action Replay…
Type in: rt 0 1 50000 and hit enter…
After the track is loaded up, behave like shown in the picture below to view
the hex dump of the filetable!

So we can see that the filepositions are stored as normal byteoffsets.
For example the first file begins from diskposition $18A0 and ends up at
position $A44C, the second file begins at $A44C (the end of the first file of
course) and ends at $C5CF and so on… The last file ends at $1EB7A4 which is
a value over 2 MB so the two gamedisks are completely filled up!
Now how did I know where the filetable is located on disk?! Let?s take a look at the
bootcode which begins at $5000C.
Type in: d $5000C and hit enter… Scroll down some lines until you see
this:

The first part of the bootblock checks if you have at least 1 MB of memory
installed on your computer (not seen on the picture), otherwise the bootcode
will loop endlessly.
But if you are the lucky owner of a memory expansion larger than 512 kb the
game will allocate $1200 bytes of memory for the rest of Track 0 ($400 bytes
bootblock, $1200 bytes other code = $1600 bytes normal DOS tracksize) and then
read in those $1200 bytes using the trackdisk device.
You can see the AllocMem() call at $50076 and the DoIO() call for
reading in the $1200 bytes at $50098!!!
Finally at $5009C it copies the filetable from boot offset $200 up to
high memory.
If you take a closer look at adress $5007A right after the AllocMem()
call you will recognize that the result of this call, which is in fact the
adress of the $1200 bytes memoryblock, is pushed onto the stack! At $500AC,
after the filetable has been copied, the following RTS instruction
fetches the last adress from the stack and continues execution at that
position. So in fact this is our JMP to the allocated memoryblock!!
So the important part of Track 0 will surely begin at offset $400. Let?s
disassemble this area using d $50400, followed by enter…

Now this looks very familar doesn?t it?! A filenumber is given in D0, the
loadadress in A0 and then a routine is called which surely loads the specified
filenumber into it?s memorylocation. As I found out the filenumber #3 is some
kind of the main gamecode which also includes another trackloader that works
the same way as this one.
To continue disassembling the code where the "JMP $8(A4)" at $5044A
will take us then, we will overwrite this instruction with a branchloop. So
if we boot up the game the program will stop at this point so we can figure out
what a4+8 is pointing to…
Insert the branch instruction and write the changed track 0 back to gamedisk
like shown in the picture below:

IMPORTANT:
IF YOU USE ANOTHER MEMORYCONFIG THAN 2 MB CHIP THE ADRESSES WHICH ARE SHOWN
FROM NOW ON WILL DIFFER!!!
Reset your machine now and let the game boot up until our branch loop is
running … you?ll notice this if nothing really happens at all! ;D
Now activate your Action Replay again and take a view onto the registers using r
and enter…
If used the above stated memory configuration then A4 will point to adress $86800,
so our jump will continue code at $86808 !!!
Let?s disassemble the code with d $86808 followed by enter…
You will have to step down some more pages until you will finally see exactly
this code:

We can see the files #6, #0 and #5 are loaded up using a trackloader at adress $8D334.
Now to grab the whole disks we will take a look onto what the trackloader is
doing… Let?s disassemble the trackloadercode with d $8D334.

Now we will take use of this trackloader to grab all the datas from disk.
We will set a breakpoint now to $8D352 so that the AR activates before
the trackloader is called…
Then we will change the loader parameters and before we continue execution we
will set another breakpoint to $8D356, the instruction right after the
trackloader returns. So we are notified when the trackloader has finished and
we can grab the tracks BEFORE the game unpacks them!
We won?t save any files to disk this time and we won?t even code a new
diskimage today… 😉 We will grab the tracks and write them directly from
memory onto our new fresh formatted disks!
As I said some lines ago, both gamedisks are totally filled up with data so we
will have to take a third disk to get all gamedata?s saved on our crack. Now
let?s think about how we partition the data on those three disks….
Taking a look back onto the filetable I decided to divide the data as follows:
DISK 1 $000000 – $0B7976
DISK 2 $0B7976 – $182E7E
DISK 3 $182E7E – $1EB7A4

So in our new loader we will first check if the fileposition on disk is e.g.
smaller than $B7976 because if true, the file belongs to disk 1. Is the
fileposition smaller than $182E7E, the file belongs to disk 2. Otherwise it?s on disk
3 ! 😉
Okay now, let?s begin with creating crackdisk #1.
We can?t just exit AR with x now coz we are still hanging in our loop.
To continue gamecode we have to jump to the adress stored in a4 + 8!
Due to the fact that A4 pointed to $86800 we will leave AR with g
$86808 followed by enter…
Now when the game starts tracking (which happens immediately) enter AR again to
set our neccessary breakpoint like this…
bs $8D352 followed by enter…
Leave AR again and wait until AR pops up… If this happens, let?s have a
look onto the regs to see what the trackloader wants to do… uhm… load 🙂
…

As we know from the disassembled trackloadercode, D1 points to the start of the
file on disk. As we can see the game wants to load file #0 now coz it begins at
$18A0 !!! We don?t need to touch this value then, File #0 is the correct
startposition for our ripping action!
The value stored in D0 is the size of the file, $8BAC in this case for file #0.
Now due to the fact that we want to rip more than just file #0 we will change
the value in D0 so that the trackloader will read in all the bytes we wanted to
store on our crackdisk #1 ($B7976 bytes). So to make the loader read in
everything from $18A0 – $B7976 we set the value in D0 to $B7976-$18A0 (all
steps are shown in the picture above) !!! At last we will change the Loadadress
of the file (stored in A0) to $918A0…
Now you may ask, why the fuck load data to $918A0 and not e.g. $90000
?!?? As we know, file #0 starts on gamedisk at offset $18A0. So I will write
the tracks to our crackdisk from $90000 later on to make sure file #0
has the correct startoffset on our crackdisk, too!
So… if you changed the regs like described you can finally set the breakpoint
to the adress right after the trackloader returns with bs $8D356,
followed by enter…
Leave AR now and wait until the trackloader has finished the job… You will
be notified with an upcoming AR screen! 😉

Now that trackloading has finished you can make sure if everything went okay with
mem watching at adress $918A0 like in the picture above.
After that I continue with reading in the Track 0 to $90000 so that we
have a complete dump of the gamedisk 1 from $0 – $B7976 in memory!
Now before writing this back to our crackdisk #1 we will have to overwrite our
branchloop that we made on the original disk coz we don?t want our crack to
hang ! 😉 Do this as shown in the pic above and FINALLY …
Insert fresh formatted crackdisk #1 in drive df0: and write the stuff with: wt
0 !134 90000 …
We write 134 tracks because… !134 * !5632 (dos tracksize) = !754688 ($B8400)
… so this is okay for our area from $0 – $B7976 !
Now creating the crackdisks #2 and #3 is even more easy… Step
back to the part in this tutorial where we boot up the original gamedisk #1 and
follow all the steps again so that your AR pops up right BEFORE the trackloader is
called…
To create crackdisk #2, change the loader parameters like this:

Leave AR and if trackloading has finished, write back the tracks on your second
crackdisk like this:
wt 0 !148 90000 followed by enter …
To create crackdisk #3, change the loader parameters like this:

Leave AR and if trackloading has finished, write back the tracks on your third
crackdisk like this:
wt 0 !77 90000 followed by enter …
FINALLY WE REACHED THE POINT WHERE THE ORIGINAL DISKS ARE NOT
NEEDED ANYMORE!!!
Now the only thing left is to insert our own trackloader which
handles normal dos tracks. To do that, reset your machine
and boot up your favourite Assembler, hopefully ASM-One. ;D
To make it easier for you I have included the whole sourcecode in the .zip
Archive together with the trackload binary.
So… reserve some kilobytes of chipmem and read in the source (using the r
command) delivered with this tutorial. Press *ESC* to switch into editor mode,
you should see something like this: 😉

Now what I do in the source is the following:
Before we run this sourcecode we will read in the first track of our crackdisk manually to memory at label TRACK0: … After that we can
execute the code which only overwrites the first trackloader of the game with our new loader from label NEWLOADER: to label NEWLOADERENDE: …
Now this loader itself checks if the game wants to load file #4. If so, the main gamecode including the second trackloader (stored in file #3) is already located unpacked in memory.
Then our loader copies itself into memory at $7FC00, a memory region that is not used by the game and places a JMP $7FC00 over the first instruction of the 2nd trackload routine. So we don?t need to touch
the packed second loader on disk.
The sourcecode with comments is following now:
LEA NEWLOADER(PC),A0 ; No explanations here, just copies the new loader!
LEA TRACK0+$566,A1
MOVE.L #(NEWLOADERENDE-NEWLOADER)-1,D0
REPLACELOADER:
MOVE.B (A0)+,(A1)+
DBF D0,REPLACELOADER
RTS
; If our new loader is called by the game, these values are stored in the following registers:
; D0 = Length of File
; D1 = Byteposition on Disk(s)
; A0 = Fileloadadress
; A1 = MFM Buffer
NEWLOADER:
MOVEM.L D0-A6,-(A7) ; Save regs on stack
LEA $DFF000,A6 ; Customchipbase in A6
MOVE.L A1,A2 ; Our trackloader needs MFM Adress in A2
CMP.L #$313,D0 ; File #4 to load (file #4 has a length of $313 bytes)
BNE.B NO ; Not yet…
LEA NEWLOADER(PC),A3 ; Otherwise copy the loader to $7FC00, Ptr to Newloader in A3
LEA $7FC00,A5 ; Pointer to $7FC00 in A5
MOVE.L #(NEWLOADERENDE-NEWLOADER)-1,D7 ; Size of our loader in bytes
COPYLOADER:
MOVE.B (A3)+,(A5)+ ; Copy loader
DBF D7,COPYLOADER
MOVE.W #$4EF9,$7082(A4) ; Place the “JMP $7FC00″ …
MOVE.L #$7FC00,$7084(A4) ; … into the second trackloader code
NO:
LEA DISKSTATUS(PC),A5 ; The current disknumber in drive is stored here (1/2/3)
CMP.L #$B7976,D1 ; Fileposition on disk below $B7976 ?
BLT.B DISK1 ; Yep, file belongs to disk #1 !
CMP.L #$182E7E,D1 ; Fileposition on disk below $182E7E ?
BLT.B DISK2 ; Yep, file belongs to disk #2 !
DISK3: ; Otherwise it belongs to disk #3 ! 😉
CMP.B #3,(A5) ; Disk 3 inserted ?
BEQ.B DISK3IN ; Yep, continue…
MOVE.W #$00F,D7 ; Otherwise move colorcode *blue* to d7
BSR.W FLASH ; Flash Screen and wait for mouse!
MOVE.B #3,(A5) ; Disk #3 is in drive, save status
DISK3IN:
SUB.L #$182E7E,D1 ; File at $182E7E starts at $0 on disk 3… sub value!
BRA.W READIT ; Read the file!!!
; No more explanations for the handling of disk 1 and 2, all the same as for disk 3 now …
DISK2:
CMP.B #2,(A5)
BEQ.B DISK2IN
MOVE.W #$0F0,D7
BSR.W FLASH
DISK2IN:
MOVE.B #2,(A5)
SUB.L #$B7976,D1
BRA.W READIT
DISK1:
CMP.B #1,(A5)
BEQ.B READIT
MOVE.W #$F00,D7
BSR.W FLASH
MOVE.B #1,(A5)
READIT:
DIVS.W #$1600,D1 ; Get tracknumber where actual file starts on
SWAP D1 ; Swap d1 to get the rest of our divison …
MOVE.W D1,D2 ; … which is the byteoffset on track!
EXT.L D2 ; Enlarge d2 to longword
CLR.W D1 ; Clear the rest value in d1
SWAP D1 ; Swap d1 again so we have tracknumber.l again
BSR.B TRACKLOADER ; Jump to the trackloader
MOVEM.L (A7)+,D0-A6 ; Restore regs
RTS ; Back to gamecode
FLASH:
MOVE.W D7,$180(A6)
BTST #6,$BFE001
BNE.B FLASH
RTS
DISKSTATUS:
DC.B 1,0
TRACKLOADER:
INCBIN “TRACKLOADER.BIN” ; Our trackloader!! 😉
NEWLOADERENDE:
TRACK0:
BLK.B $1600,0 ; Space for one dos track!
Now behave like in the picture below…
Assemble the stuff using a, insert your crackdisk #1 and read in Track 0 using rt…
Finally execute the source using j and write back Track 0 with wt !!!

Now that our crack is finished, reset your amiga and have a play…. This game rocks (not)! ;D

Special regards to Musashi9 for hosting the (nearly) best website worldwide and
of course to ROB and his cracking girlfriend.
Alpha
One ?2005!
girls just don’t know what they miss 🙂
The chance for that, is as big as finding a virgin on a maternity ward….
probably you could convince your girlfriend too, to write some tuts rob 🙂
nice to see the superior alpha_one tutorial series going on. 🙂
As usually, nice stuff.
If she reads your tutorial, I will be a dead man 😀