Amiga cracking
————–
"Armalyte" (c) 1991 Thalamus
—————————-
Things you will need:
1. The original of "Armalyte" (c) 1991 Thalamus. The CAPS (SPS) version (number 1686) is the one I’ve used here.
2. An Amiga or a copy of UAE.
3. ReSource, or another suitable disassembler.
4. Asm-One, or your personal favourite assembler.
Another day (year?), another amiga cracking tutorial! Our target today is a game called "Armalyte", which c64 freaks will remember fondly – sadly the amiga version is a very poor game unworthy of the name. However, we’re not here to worry about playability (or the lack thereof), we are only interested in cracking the protection… so let’s get to work.
First steps first, let’s attempt to copy the original and get a quick idea of what we’re dealing with (eg: is it a custom MFM format, or does it only have 1 longtrack/badtrack that it checks):

Ok, it’s a custom format disk so we have a bit more work to do than simply bypassing a Copylock or similar badtrack protection. Just to make it interesting, and hopefully learn a bit more about the whole process of cracking amiga stuff, we’re going to go the ‘purist’ route, and avoid using any cartridges such as Action Replay.
Since we know everything except the bootblock is in a custom format, it stands to reason that the loader which understands and interprets this format is in the bootblock. This is good news for us, since it makes ripping it out extremely easy since we only have 512 bytes to disassemble and comprehend (and 12 of those can be ignored 🙂 ).
The first tool we’ll use is the disassembler ReSource, so load that up and use the "Disassemble Bootsector" option found in the "Macros 3" menu (once you insert disk 1 of Armalyte!). Scroll down to the first "LEA" line, and then use the "Labels->Create multiple->All" option to give all the subroutines individual names. You’ll need to scroll down to several of the lines which contain code like "BRA START+$xx" and place the cursor after this, and do the "Labels->Create multiple->All" a few more times to make the disassembly complete. Once you are happy with the disassembly ReSource has provided, save it out to your workdisk using the "Save all" option. Now we’re ready to start Asm-One and begin the real work…
Load our disassembled bootblock into Asm-One, and we can see all the usual setup code common to many amiga productions… code is executed in supervisor mode (in this case by setting the address of the code in $20 (Privilege Violation exception address)), DMA is turned off and the bg colour is set to black. That is the end of the (very minimal) setup, then the loader is copied to $7C000 and executed.

We can see the 2 addresses that the bootblock uses, after the first BRA instruction in the bootcode. The first long is $1FDE8, the second long is $7C000. We know the $7C000 is the address that the loader is copied to (we can see it being loaded into the A2 register before the little copy loop), and so we can guess that $1FDE8 is the load/execute address of the first code loaded by the bootblock…a few instructions later we know our guess was correct, when we see these lines:
 MOVEA.L lbL00000E(PC),A0   ;fetch $1FDE8 into A0
 MOVE.L	A0,-(A7)            ;and push it onto the stack
 MOVEQ #0,D0                ;select file 0 in the filetable
 JMP 4(A6)                  ;and JMP (*not* JSR) into loader
At this stage A6 points to the loader start, and 4(A6) points to a BRA into the loader proper…because there is a JMP rather than a JSR, when the loader code finishes and performs an RTS to return, the load address ($1FDE8) is fetched from the stack and ‘returned’ to – thereby executing the code it has just loaded!
Now, how did I know the MOVEQ #0,D0 instruction refers to an entry in a filetable? Easy – look at the code 🙂 If we follow the branch that the JMP 4(A6) would take us to, we can see that the value in D0 is used as an index into some kind of table, some values are fetched from this table, and the load is performed. But what’s in the table right now? Nothing! That would seem like a very bad start to our file-ripping adventures, but fear not – there’s a call to the loader before this one, where D0 is set to -1… I wonder what that call does? It should come as no surprise that this loads the disk 1 filetable!
So we put together a little program, that does what the bootblock did (in terms of setup code) and loads the filetable for us to look at (see the attached archive for all the source code used during this crack). If we take a look at the code that fetches values from the filetable, we can start to make some educated guesses at the loader parameters. For a start, we know that each entry in the filetable is 8 bytes long since the index value is multiplied by 8 (the ASL #3,D0 instruction simply shifts D0 3 bits left, which is the same thing). We know that the params are used as byte,byte,word,long (from the way the loader fetches the values into D0-D2 and pushes a long onto the stack). Let’s take a look at the filetable – specifically the first entry in the table, since that is the entry used by the bootblock to load the first executable from the disk:
	0 = $02,$01,$0030,$00006178
	1 = $06,$02,$0094,$0001299C
	2 = $12,$07,$00E7,$0001CF11
	3 = $25,$0B,$00F7,$0001EFA6
	<...rest of table...>
So my first guess was that the longword at the end is the filesize, and that the word value is probably the number of sectors to load (a sector is typically $200 bytes long, and if we divide $6178 by $200… guess what we get? $30!). We can also figure out the other values by looking at the code which loaded the filetable in the first place…see the parameters it uses when it loads the table? D0=2,D1=0,D2=0 (look at lbC0000A8 onwards in the disasm). From this we can deduce that the first value is the track to start on, and the second value is the sector on that track to start from. We can reassure ourselves that we are correct, by seeing if our guesses make sense with the other entries in the table:
File 00 starts on track $02 at sector $01 and is $30 sectors long.
File 01 starts on track $06 at sector $02 and is $94 sectors long.
This makes perfect sense, if our gamedisk uses 12 sectors/track (unlike a standard AmigaDOS disk which uses 11) – we know that it does if we look at the routines in the loader which actually do the physical loading (setup DSKSYNC and start disk DMA). The important things to look at here are the setting for the DSKSYNC register ($DFF07E), and the amount of data it tries to read from each track.
 LEA $DFF000,A1          ;Custom registers base in A1
 <...>
 MOVE.W	#$4489,$7E(A1)   ;word to use for sync ($4489)
 <...>
 MOVE.L	lbL000230(PC),$20(A1)   ;address to use as MFM buffer
 MOVE.W	#$981C,$24(A1)   ;amount to read from disk ($8000 means read)
 MOVE.W	#$981C,$24(A1)   ;...so $981C means read $181C words
 <...>
Allowing for gaps/checksums in the MFM data, this leaves us with $1800 bytes/track, which is 12 sectors of $200 bytes each – as we expected! For further proof, we can see at lbC0000E0 the loop that checks how many sectors have been processed, and we notice the CMP.W #12,D1 instruction which confirms what we thought about the disks structure. So with a minimal amount of work, we have ripped the filetable and worked out all the parameters that the loader requires – surely it’s time to rip some data!
The filetable contains 23 entries, but as we can see several of them appear to be ‘dummy’ entries (they only load 1 sector, and the filesize is a mere 5 bytes). I suspected the real files are on disk 2, and if we load one of these strange files (the first one is entry 6 in the filetable) and examine the contents, we can see that we are correct (again!)

Incidentally, you can also see text from the utils disk the games coder was using at the time 🙂 But anyway, let’s not get distracted… from the filetable we can see that there are 15 real files on disk 1 that we need to rip, so we’d better get started. We know the game loads entry 0 in the table first, and that it contains executable code (since the bootblock jumps into it after loading) – we should probably load it and take a look ourselves. Again, the source to rip files from the original disk(s) is included, but honestly you should be able to code this yourself if you are able to follow the rest of this tutorial, so give it a try!
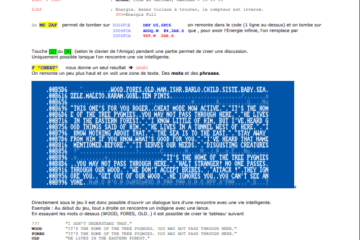
So we read in file 0 ($6178 bytes long), and disassemble it in Asm-One, and what do we see?

Well, the usual startup code (setup SR, set stack pointer, save regs) is all present and correct, but take a look at the 2 lines I’ve commented in the picture above. The 2nd line is clearly a packer signature ("Ice!"), so the bulk of the code in this file is packed. But what about the suspicious branch before the depacking occurs? If we disasm this (and of course your addresses will be different from mine, so make sure you disasm the branch correctly), we see 2 BSR’s that we should check out. Disassemble the first one, and we get a nasty surprise:

Most of you will recognise this as the initialisation for Rob Northen’s (in)famous Copylock protection! Wait…wait… come back! We’ll bypass it easily, if you’re interested in a more in-depth explanation of Copylock please check out one of the many tutorials on the subject on Flashtro. I’m going to take a quick & dirty approach to cracking it here, since it’s not the focus of the tutorial.
So, if you were paying attention you would have noticed that the address of the Copylock routine seems to be quite near the end of the file we loaded…what are the chances the Copylock was just stuck on the end of the packed code? Let’s take a look at the last few instructions in the file (by disassembling loadbuff+$6178 and scrolling back a few lines). Now, that looks promising:

We can see the typical magic number check, and we can be fairly confident this is the real thing since if the key is correct, it loads the start address and size of the packed data into registers before returning (and we can confirm the "Ice!" decrunch routine needs these to be set, by looking at the first few instructions in the file). We will need these values to decrunch the ‘real’ code, so note them down somewhere. If the key is not correct, the reset routine is jumped to…very subtle! Of course within the encrypted Copylock itself, the key could be overwritten and other checks could occur, but at the moment we’ll assume this is not the case for this game.
So the packed data begins at loadbuff+$218, and is $5610 bytes long. Now we need to execute the "Ice!" depack with these values so we can see what it contains. The depacker begins at loadbuff+$0c, and is relocatable code so we can just load A0=loadbuff+$218, D0=$5610 and BSR loadbuff+$0c and wait for the unpacking to finish.
Once that has happened, when we disassemble loadbuff+$218 (the packed data unpacks over itself, a so-called ‘in place’ decrunch) we can see valid code so we know the decrunch was successful. Another thing we should do before we move on, is save out the "Ice!" decruncher in case other files on the disk are also packed (quite likely). We know it begins at loadbuff+$0c, and we can see it ends at $loadbuff+$200 (the packed data started at +$218, and the 8 bytes before this are the 2 BSR’s that call the Copylock check and the decruncher afterwards), so we can simply save it out using the WB (write binary) command from Asm-One.
We can also save out our newly-unpacked file, but how do we know the length?
Well if we look at the beginning of the decrunch routine, we see 2 calls to a subroutine that does the following:
.LOOP
	MOVEQ #3,D0
	MOVE.B -(A5),D7
	ROR.L #8,D7
	DBF D0,.LOOP
When this is called for the first time, A5 points to the end of the file (we know this because it is calculated by A0 (start of file) + D0 (size of file)), and it returns "Ice!" in D7 from the end of the file… the second time it is called, it returns the unpacked size of the file in D7, which is what we’re looking for. Rather than ReSource or patch the depack routine, I chose just to include these few lines in my source code (point a reg to fileend-4, and get the len then store it). This way you can simply look at the stored value, and dump the file out from loadbuff to loadbuff+filelen each time.
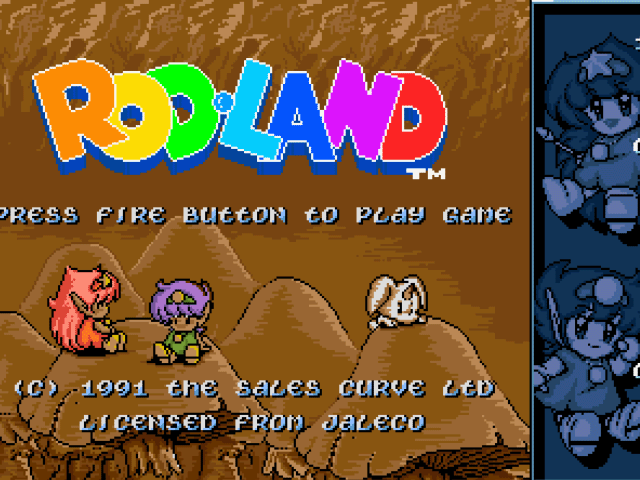
Now if we repeat the load/decrunch as before, turns out the unpacked file is $18ce0 bytes long (but it compressed extremely well since most of the file is empty or filled with repeating data – almost certainly the 3 logos we see displayed as the original loads). As we did with the depack routine, we dump this file out using the WB command, and we’re ready to move on!
You can either write a little loop to step through the filetable and load all the files in one go, or just load/dump them individually. I chose the latter, since I wanted to take a quick look at each file to check if it was packed, or obviously code or data as I went. After I loaded 3 files, it became clear that all files on the disk are packed with the same "Ice!" packer as the first file we ripped, so I chose to save the decrunched version of each file rather than the original packed version for 2 reasons:
-
[1] We don’t know which files are code/data, and therefore we don’t know if there are further loaders/protections lurking within the packed files.
[2] "Ice!" is quite a poor packer, both in terms of the low compression and the time depacking takes.
I always like to give the files names that make sense in relation to the filetable I’m using to rip them… for example, file 1 (entry #2) has the parameters: 06,02,0094,0001299C. I chose to save my unpacked version as "d106020094.unp", the "d1" part for the disk the file came from, and the extension ".unp" to remind me it’s now unpacked. This makes things much easier when it comes to reconstructing the disk images for our final cracked version, since it’s obvious at a glance if we’re forgetting any files when we look at the original filetable.
Once I had all the files from disk 1 (the real files, ignoring all the 5-byte entries in the table), I changed disks and tried the loader again in the hope that the filetable on disk 2 was in the same place as disk 1 (track 2, sector 0) – and fortunately it was! So we can proceed to rip all the files from disk 2 in exactly the same way as before, skipping the 5-byte files (which of course now say "Dsk1" instead 🙂 ). Now if we compare the file-tables from both disks, you will notice that there are 3 files that appear to be present on both disks. Entries $12, $13 and $15 in the filetables:-
[Disk01]
$12 = 78,04,0028,00005059
$13 = 7B,09,0082,000104E9
$15 = 86,09,000C,0000199A
[Disk02]
$12 = 34,00,0028,00005059
$13 = 37,05,0082,000104E9
$15 = 52,0B,000C,0000199A
Remember the format is: start track,start sector,number of sectors,filesize. So we can clearly see that the files are the same, simply on a different position on disk 2. I ripped them to be 100% sure they were identical (ripped/depacked and file-compared them) to the files we already ripped from disk 1 ("d178040028.unp", "d17b090082.unp" & "d18609000c.unp" respectively) and confirmed that they were – this made me wonder if a 1-disk version of the game would be possible without cutting anything out, but sadly a quick (very non-scientific!) test of roughly the kind of compression we can expect (by zipping all the files into 1 archive) shattered that idea, since at best we can expect 950k-1mb of packed data which clearly won’t fit on one 880k AmigaDOS floppy.
Once we have ripped all the files from disk, it’s time to go looking for further loaders – the most obvious place to look is inside file 0, since this is the first file loaded and we know it’s executable. I was going to search for $4489 (the sync we know is used throughout the disk), but as it turns out if you disassemble the file you will see another loader quite early on, it’s located at filestart+$392 and unsurprisingly looks a lot like the one we ripped from the bootblock 🙂 As an added bonus, if you continue disassembling we find the "Ice!" depack routine in memory immediately following the loader, at filestart+$75e – worth noting since we intend to replace the depacker as well as the loader in our cracked version.
Now it would be a very dull task indeed to search through every file manually in Asm-One’s disassembler and look for further loaders, so I wrote a few lines of code to search for the first 12 bytes of the loader (which are 3 BRA.W instructions – chosen because they were identical in the loader we ripped from the bootblock, and the loader we found manually in file 0). Assuming we didn’t miss any (which at this stage is unlikely, but possible), I counted 3 files containing a loader that we need to replace in our crack. Now you can check these files for the "Ice!" depacker, and note where it appears in each… conveniently, it always appears at loader+$3cc in each file 🙂
So since we know which files contain loaders and which don’t, we can proceed to the exciting task of packing files. Obviously we don’t want to pack the files with loaders inside, since we haven’t patched/replaced them yet, but we can go ahead and pack all the other files. I chose Imploder (IMP!), since it has a fast and very small decrunch routine which I suspect we can locate over the top of the games original "Ice!" depacker which probably occupies more memory. So, we pack the files individually like so:
Fimp d106020094.unp d106020094.imp -IO
Produces the packed file "d106020094.imp" (the -IO is "Implode Only"), as you probably guessed. I’m sure you can all manage the challenging task of packing the other files without instructions…
Now, it’s time to look at what is required to replace the game loader (+ depacker) with our own. First thing, is to find out how much space the 2 routines take up in the original code. By subtracting the start label (ARMALOAD) from the end label (lbL000234) in my example source, I got a size of $1cc bytes (460). We can see the filetable is loaded to RAM at the end of the loader in every case, so we need to add this also to get the final size – the filetable is 23 * 8 in size, so that’s $b8 bytes (184) to add, giving us a final loadersize of $284 bytes (644). We know the filesize of the depack routine since we ripped it earlier – it’s $204 bytes (516) long.
The "IMP!" depacker is $15e bytes (350) in size, so we have no problem finding memory for it – we simply overwrite the "Ice!" depacker. This will also leave us the added bonus of $a6 bytes (166) spare, which we can potentially use for something else.
There is one more thing to consider, and that is the how the original game handles the disk-swapping. By overwriting the loader(s) with our own version, we are potentially nuking routines the game will use when it can’t find the file it is searching for on the current disk. Since we know that the game uses dummy files containing "Dsk1"/"Dsk2" to indicate the file being searched for is on the other disk, let’s take a look at what the game does if it finds this string…

So, what happens is file $15 (from either disk, remember this is the same file on both) is loaded and decrunched to $54000. Then it is called with the disk number that the game expects (D0=0 for disk 1, and D0=1 for disk 2). This file seems to just show the diskchange screen and wait for a disk to be physically changed in the drive before returning. The actual check for which disk has been inserted is done by loading file $16 (on both disks this is basically a disk label, a 5 byte file containing "Dsk1" or "Dsk2" as we have seen before, except that now it tells the game which disk this is rather than which disk the file can be found on), and comparing as per the picture above.
For us this is good news, since we can just leave this code unpatched and let it go about it’s business as the original did! We only have to patch the loader(s) proper…
Now comes the main ‘meat’ of the crack – putting it all together. First, we should take a moment to think about what we need to do:
-
[1] Include the setup code that we removed by bypassing the Copylock and unpacking the first file on disk 1.
[2] Create a new filetable (actually 2, since there are 2 disks).
[3] Insert our load and decrunch routines into the correct places, including any little pieces of code required to change loader params etc. to a format we can use.
I did come across one slight problem however… with files 0 and 1 unpacked (because they contain a loader/decruncher that we want to replace), all the files from disk 1 won’t fit back on a normal DOS disk. The solution is, of course, to pack them after the patching has been done, which means we need to patch the files & pack them to ensure the filetable contains the packed size for each of the 2 files, before we write the final diskimage for disk 1. Disk 2 is handled the same way, except there is only 1 file which contains a loader on this disk and it doesn’t need to be packed (it was unpacked on the original too!), which makes life easier.
Because the loader I used for my crack (a sectorloader by NOMAD) is bigger than the original loader, I had to move the filetable to $100 instead of at the end of the loader code (since the game loader without filetable is 460 bytes long and our loader is 500 + some bytes for the code that converts the games loader params to our own, etc.), but otherwise there were no major changes required. My filetable is stored immediately after the bootblock (on sector 2, bootblock occupies 0-1) before the main data on each disk. The depack routine we used ("IMP!") even uses the same arguments as the original games’ packer ("Ice!"), that is A0=packed data address, so we don’t have to touch the setup for that, simply overwriting the original decrunch routine is enough.
Then it’s simply a matter of testing the crack – here I must confess I cheated (!) and used the builtin levelskip + invincibility code (pause game then type "DELTA3", then "N" to skip levels). Of course you should look for an ingame cheat by disassembling the key irq (check what $000068 is set to during the main game exe, and follow the code), or use AR or Thrill Kill or whatever method you want to train the game yourself – don’t use my lazyness as an excuse for your own! 🙂

I played through the entire game (it loops after the "congratulations" screen) twice, disk-swapping where asked, and everything seems to work correctly.
So that’s another game cracked – this time you probably noticed I didn’t explain every step down to the detail of what you should type at each stage. This is because after flashtro.com having been around for 5 years, and lots of tutorials on these topics being available, there should be no need. If you’re interested in cracking amiga stuff, you will have to learn the techniques presented here (and hopefully some better ones) for yourself – all I’m giving you is a gentle nudge in the right direction!
I’ve also tried to keep it as generic as possible, so all the rambling about finding loaders/packers, ripping files, patching etc. should be applicable to any custom MFM games really – the only differences are in the amount of protection (encryption, checksums, further diskchecks, novellas etc.), not in the basics above.
Until next time,
-WK
Very thorough, and makes me want to get my shit together as soon as my replacement 1084s gets here.
Cool stuff. Great work WK!
Excellent detail and a fine read !