Delphine Software
For this tutorial we will need the following
1. An original disk (make a backup and always use the backup)
2. The code wheel that came with your original disk
3. Action Replay III Cart
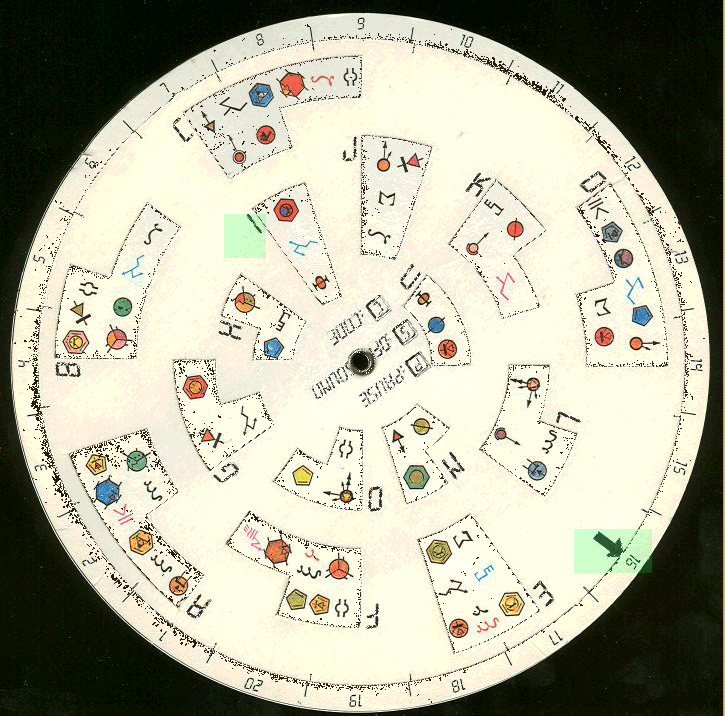
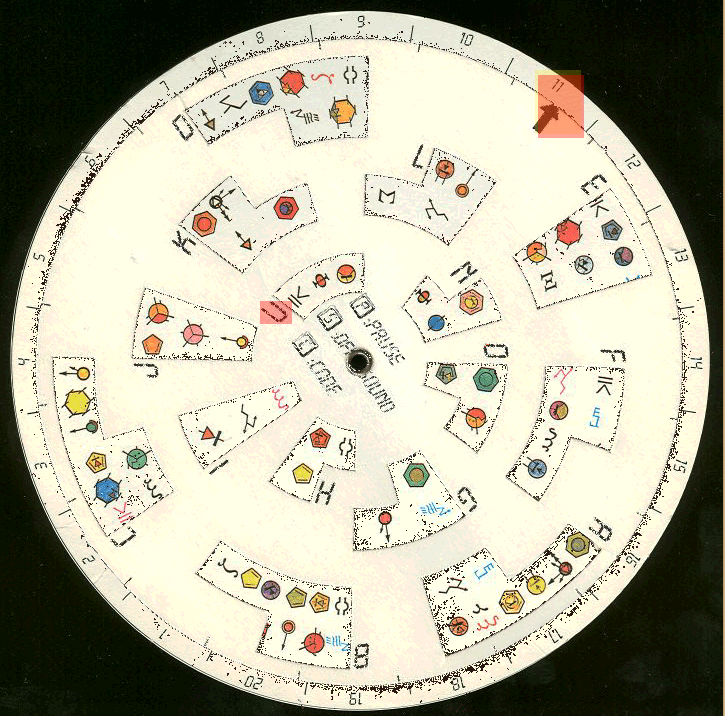
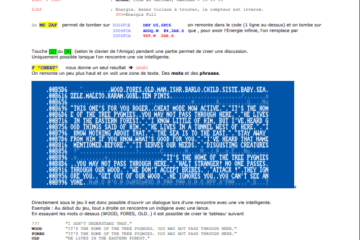
If you don’t have the code wheel you can use this one I created in FLASH/
Code Wheel
Once you have all of these things we shall begin
IMPORTANT NOTE:
Some of the memory locations you see in this tutorial may not match what you see when you follow the instructions. This is because your Amiga memory config may be different than mine.
I use kick 1.3 with 2mb of chip ram and no slow or fast ram
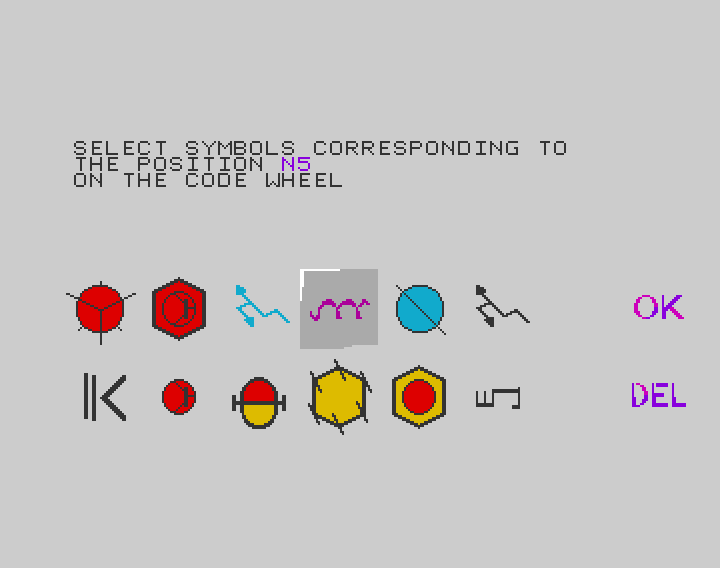
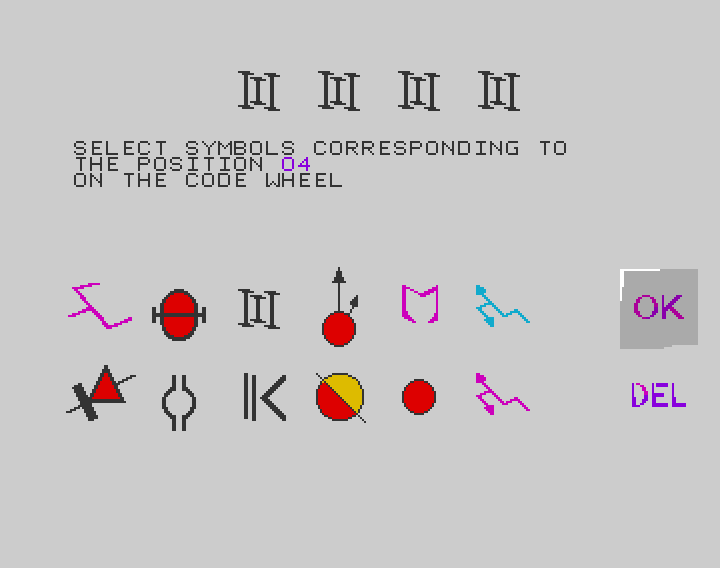
Fire up your Amiga with disk one in the drive. We should end up at a screen that looks a lot like this one below (note: your code position will be different that mine, which is I16) This is because the game sets a random code position each time it boots
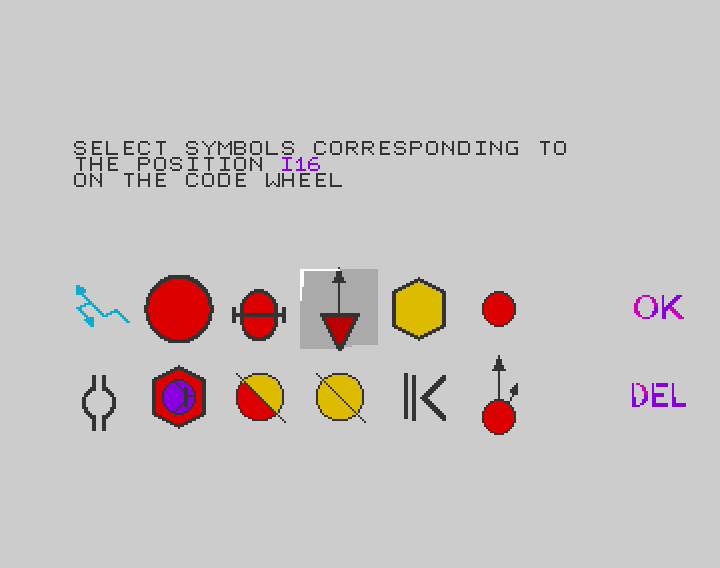
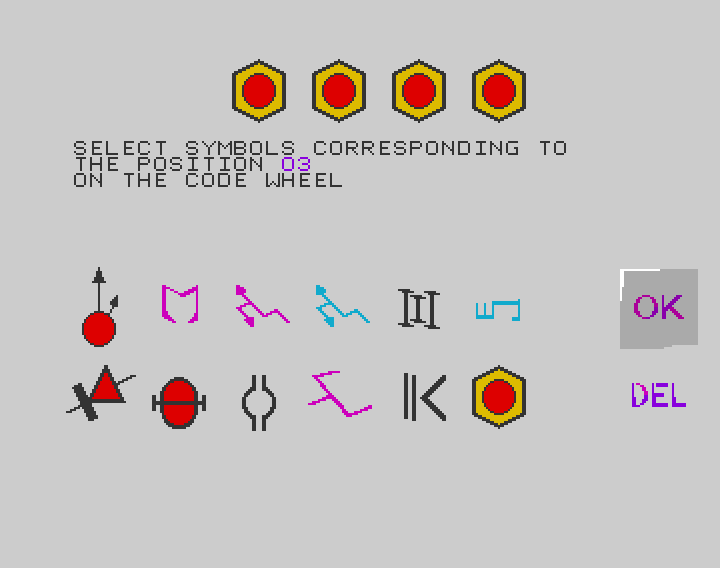
What we have here is a protection screen that requires you to look at your code wheel at position I and number 16 (this will be different for you, but follow the same instructions anyway) Then once you have the correct symbols identified you must enter them one by one, then move over to the right and select OK.
Now it is time to enter our ActionRelay cart and see what is going on. (enter cart using the freeze button)
What we want to do is find out what happens when we press the fire button to try and see what the code does.
To do this we must look in memory for any code that relates to the fire button, which is #7,$bfe001.
So lets start looking for anything that is testing $bfe001.
We want to search for $bfe001 so we use AR’s FIND ADDRESS function
FA BFE001….In the picture below we have several hits so lets start with the first one and see what that is doing.
We are going to disassemble the code for the first hit by using D function so type
D 212ea (note: This address may be different for you depending on your config, so type D …whatever your first hit address is)
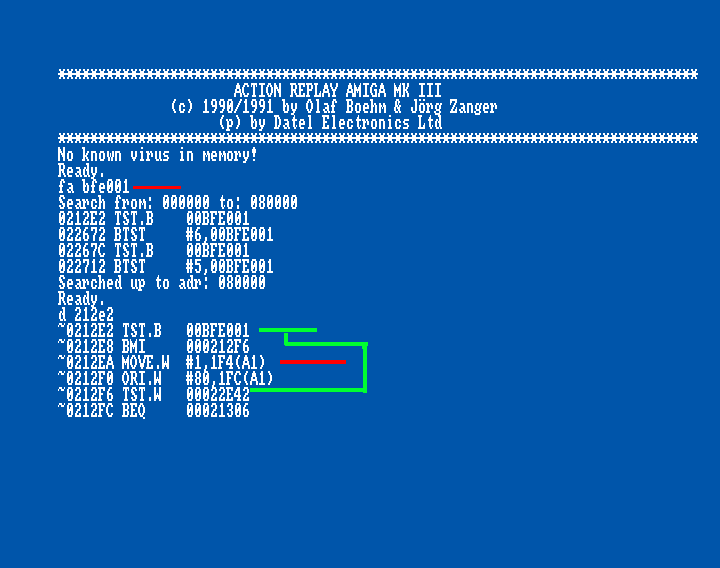
In the disassembled code we see it test bfe001 and if minus skip
to 212f6. We want to know if the code it skips has anything to do with
our protection screen and fire button so we will put a BREAKPOINT at
address 212ea
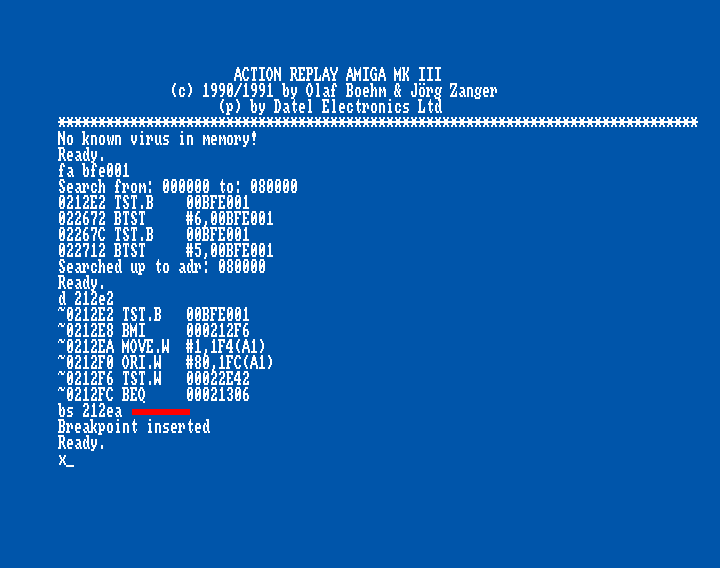
We use the break point set function
BS 212ea
Now exit with X and press the fire button
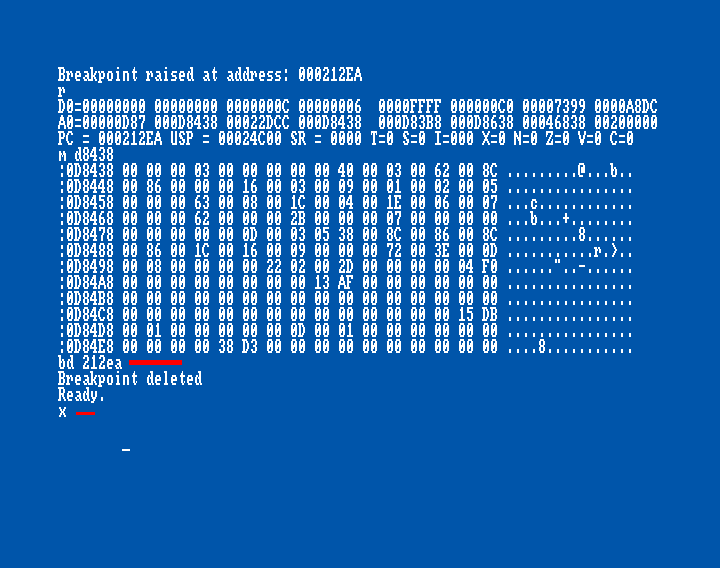
After pressing the fire button we are instantly transported back into AR and a msg telling us Break Point Raised at address 212ea.
If we look at the code that we set a break point on we see it is moving #1 to add 1f4 of what ever is in A1
Let us take a look at at the address at A1 we first need to know the address so bring up the REG display so we can look at all the registers and address points currently going on with the game code
type R to achieve this

We don’t need to break point any more so delete it with the bp delete function
BD D8438
In the image above we see that A1 for me is D8438 (it may be different for you)
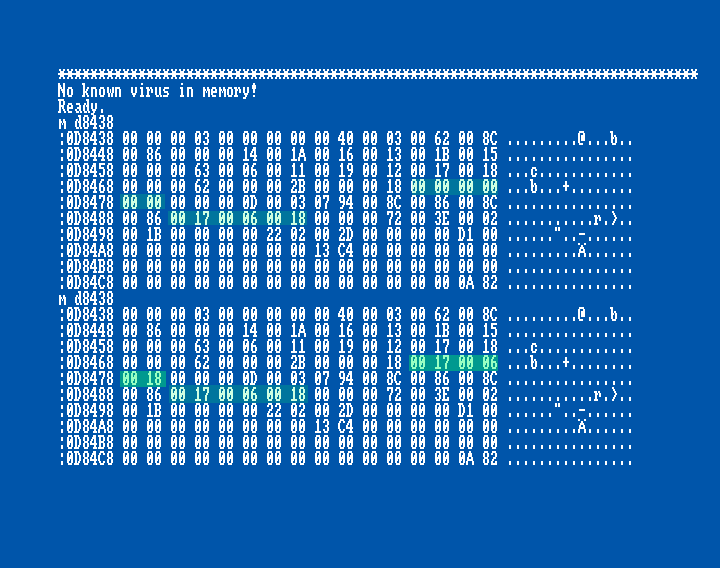
Now take a quick look at this address by viewing it in memory with the M function
M d8438
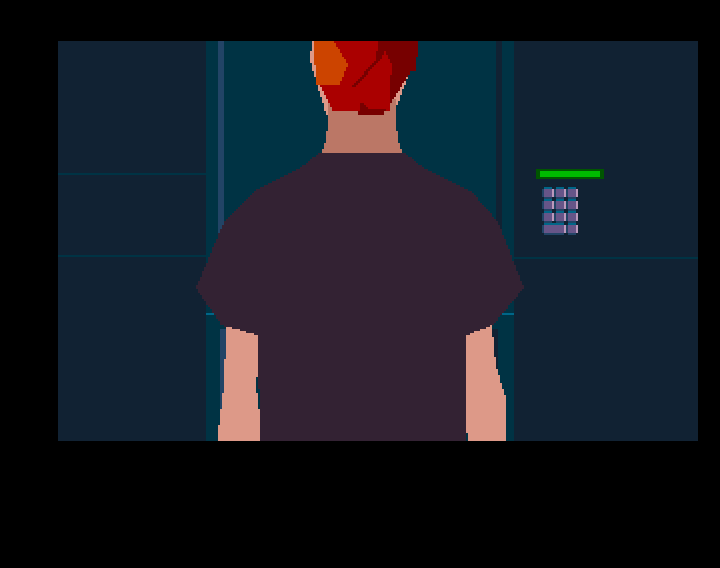
Once again we exit AR but don’t do anything, as we set a Break Point when the fire button was pressed it should fire once we leave AR and you should see a symbol appear at the top of the screen.
When you see the symbol appear it means we selected a symbol and the game entered it into the memory bank.
Without pressing anything else we need to re-enter AR and take another look at our A1 address to see if it has made any changes just from one press of the fire button.
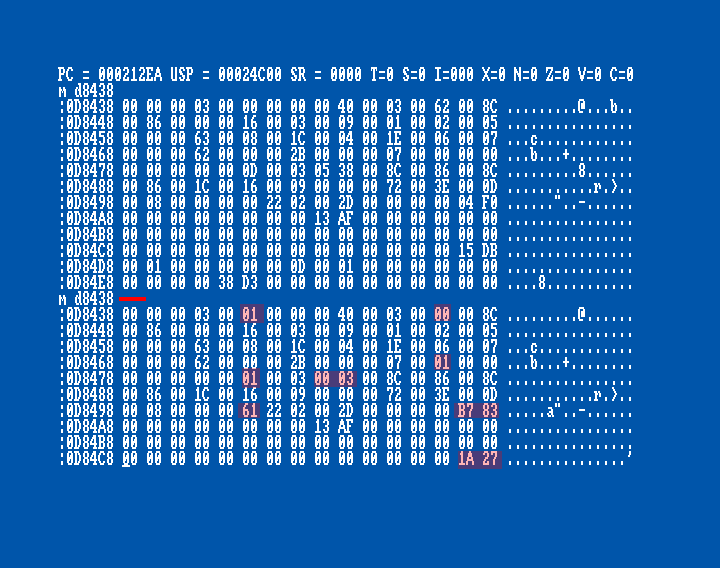
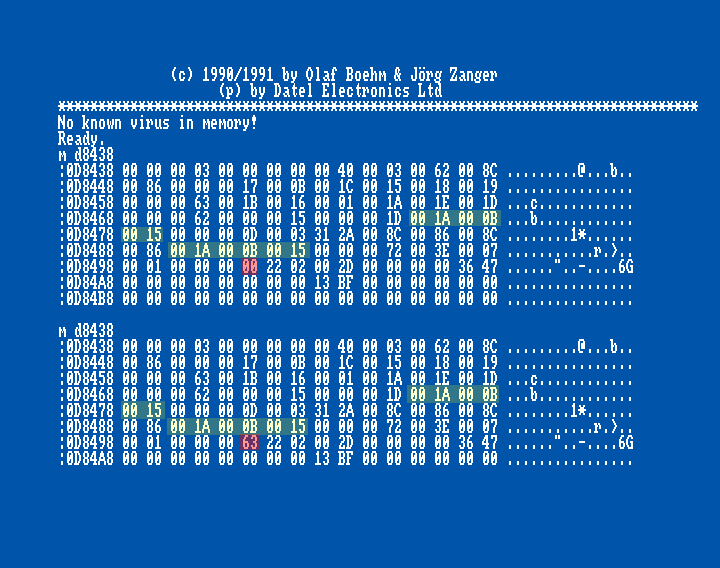
I have highlighted in red the changes it has made just from pressing the fire button once.
Now exit again and press the fire button one more time then come back into AR and see what changes it has made
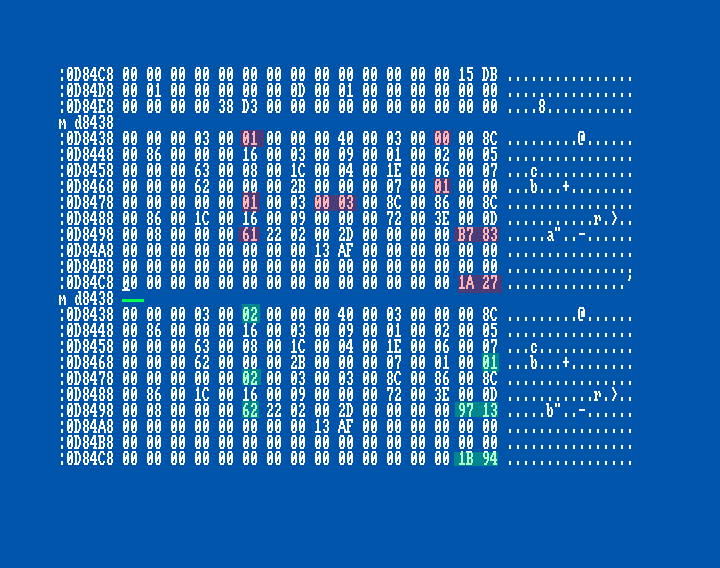
This time I have highlighted the second button press changes in green. the green 03 at position #5 was originally 0 then after one fire press it became 01 then 02 after the second fire button press.
This could be a counter for how many symbols we have chosen. Also look at the green 00 01 on the right side. This was 00 00 and the 00 01 to its left was 00 00 before the first fire press. This is interesting, lets keep an eye on this area too. (I wonder if we press fire again will the 00 00 next to the green 00 01 become something else?)
I am not sure what the green 62 is under the green 02 but it did grow by one after the second button press, but it was 00 before the first button press, so lets keep an eye on this too.
Now it is time to get out your code wheel and use it.
Code Wheel
For me I need to move the wheel to I 16
Enter these 3 symbols and move the selector so it is over the OK button, but don’t press FIRE, instead enter AR and take a look at what has changed

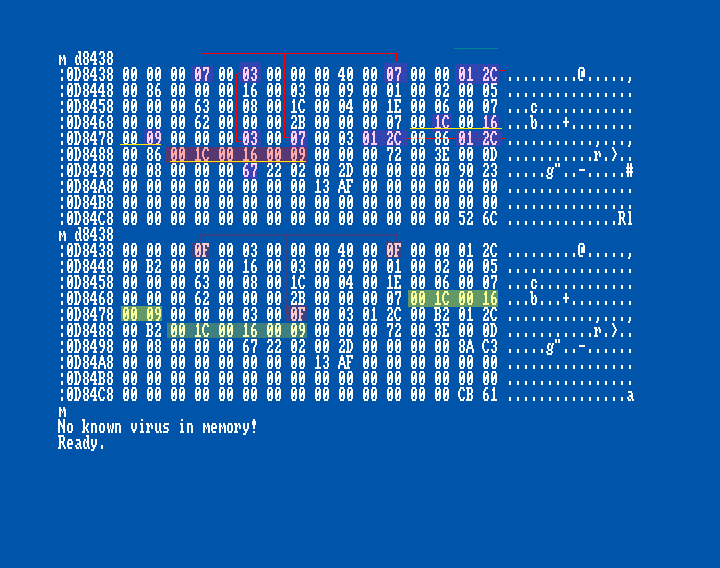
As expected the counter has gone from 02 (when we had 2 symbols) to 03 now that we have entered 3 symbols.
The 62 is now 67.
The 03 at offset 4 has now changed to 07 but most important of all is the empty space that we first had without any fire buttons being pressed has now been filled up with data (highlighted in yellow) but the surprising thing is, it now matches the digits located at offset $52 (highlighted in red)
So we can conclude that the red highlighted digits are what the game code is looking for and it expects to find them in the yellow highlighted area.
I want to know why the 03 changed to 07 at offset 4 so exit AR and move the selector over hmm lets say DEL. Then re-enter AR and take another peek
07 has now changed to 0F and all we did was move the selector down. If we think about the selector screen in numbers then it makes sense to think of this number as a marker for the current position.

This is great to know because we can use this information in our patch. Basically we can check if we are over the OK button and if true perform our sneaky little copy patch that will steal the correct data from offset $52 and move it to the empty space at $3c. We don’t want to do this when it is over any other symbol.
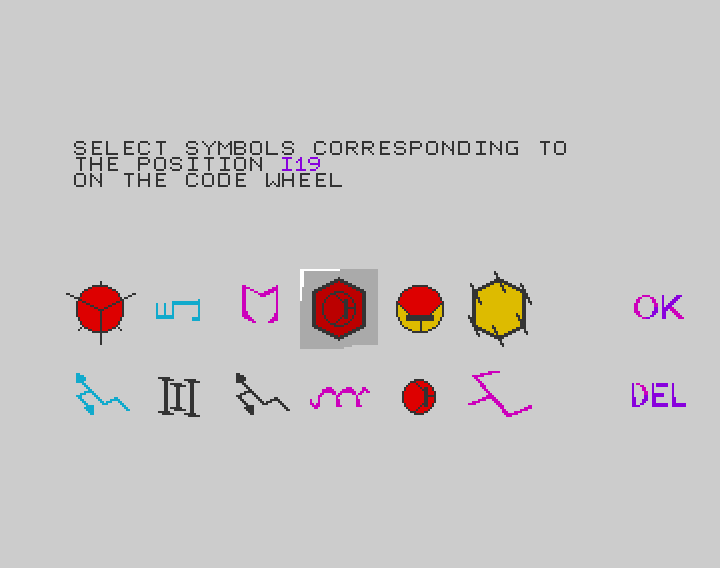
Anyway time to check if our symbols were correct. Exit AR and press fire when you are over OK.
You should be presented with a second protection screen. This game uses 2 protection screens

Re-enter AR at take another look at our A1 area

We can see 0f at offset 4 is now back to 03. We can now say that this is indeed without a doubt a position maker for the selector.
Our empty space is back and we have new digits at our $52 offset.
OK time to fire up the code wheel and look for the new symbols for the second protection screen.


As expected the empty space matches the offset at $52 and the symbol counter at offset 6 now reads 03 and the 63 is back at offset $64 (red)
Ok exit AR and press ok.
We should see the game continue to load as our protection check was succesfull

However that was the easy part because we had the code wheel to work from. Now comes the fun part when we throw away the code wheel and try and bypass the protection screens without it.
RESET the Amiga.
With your Amiga now reset and a fresh new code wheel request screen in front of you it is time to enter AR and copy over the digits from offset $52 to offset $3C
copy over the digits
exit AR and hit OK ………….success!!!! the first screen was bypassed and now we are at the second request.
And once again do the same thing and copy over the digits

Exit AR and hit OK
WHOOOOPS this is not good… the first protection screen could be bypassed but the second gives a wrong code error!
Ok reset your miggy and start again. Bypass the first screen with te same method but when it comes to putting in the digits for the second screen I want to try some extra bits… remember the symbol counter from earlier at offset 6? lets try adding that to the second protection check to see if this helps. (also add the 03 4 lines below it)

Exit AR and press OK
ah crap.. ok so that wasn’t it….. hmm remember that weird 63 number that was there when we entered the code from the code wheel ? Lets try it with that….reset rinse & repeat to get us back to the second protection screen and this time when entering the digits lets put the 63 back at offset $64
Well look at that, it works!!!
Now that we can bypass the protection without the need for the code wheel we can now concentrate on making a patch that will do all the work for us without the need to enter AR each time.
We have a place for our patch which is the fire button event (for me it is 212ea)
This line of code is 6 bytes which is perfect for a JSR XXX to some place in low memory.
Type D 212ea (or the address where your fire button code is)
Now that we have the code we need to overwrite it with a JSR
so type A 212ea then JSR 100
So now when the fire button is pressed it will jump to our patch code at $100, but first we need to create that patch code.
A 100
MOVE.W #1,1f4(a1) Here we just replace the fire button code.
CMP.B #7,3(A1) Check to see if we are at the OK position
BNE 120 Not true? then skip to the end of the code and return to the game code
MOVE.W #63,64(a1) If true then start our patch and put 63 at offset 64
MOVE.L 52(a1),3c(a1) Steal the correct digits and put them in protection check empty space
MOVE.L 56(a1),40(a1)
RTS

Now exit AR and choose any symbols for the protection check and press OK
Protection screen #1 bypassed …success!! now try the second screen
Success..congratulations the protection has now been busted!!!
Now I know from experience because this is one of my favourite games that the protection screen no longer appears. However I also know this type of selector screen does appear again and it is with the level code screen. Hmm so press C at any time to enter the code screen And I also know the code for level 1 is EDJI so lets make sure this level select screen still works. Enter EDJI ….hmm oh crap it seems it is still loading our patch and screw up the level select screen.

Ok it seems our work is not yet done. We need to remove our patch after it has bypassed both protection screens. Lets take a look at A1 to see if anything stands out.

I now see a lot of FFFFs and the one at offset 20 interests me. I did do some further testing and the patch code also affects the game code

HEHE we end up at some weird places when the fire button is pressed. So we really need to kill this patch before the game starts. I also took at look at A1 when the game was running and offset 20 has values in it too so we know that with the game running and the level select screen that offset 20 has value but if we look at all the times we were at the protection screen, offset 20 is empty. We can use this to make adjustments to our patch.
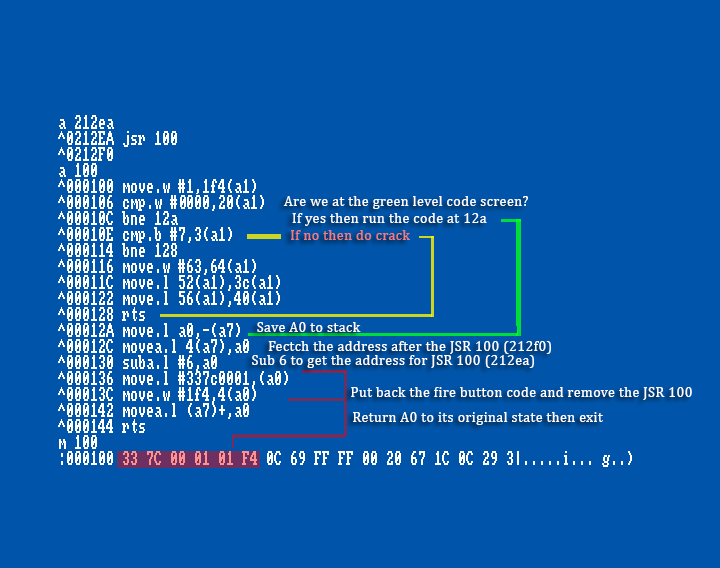
In our new patch we added a couple of lines at the top and bottom to check if we are in the protection screens and if not kill the patch.
The code at 12a saves register A0 because we will need to use A0 to kill our patch.
@12c we fetch the location of our JSR100 but it is past it because it has run it already so @130 we SUB 6 to get the actual location of our JSR 100
@136 and 13C we move the hex value for the fire button code (taken from HEX VIEW of 100) and we move it back over our JSR 100 so the game is now back to 100% and no longer needs our patch.
@142 we just restore A0 that we trashed with our little kill switch.
@144 we just return and let the game run.
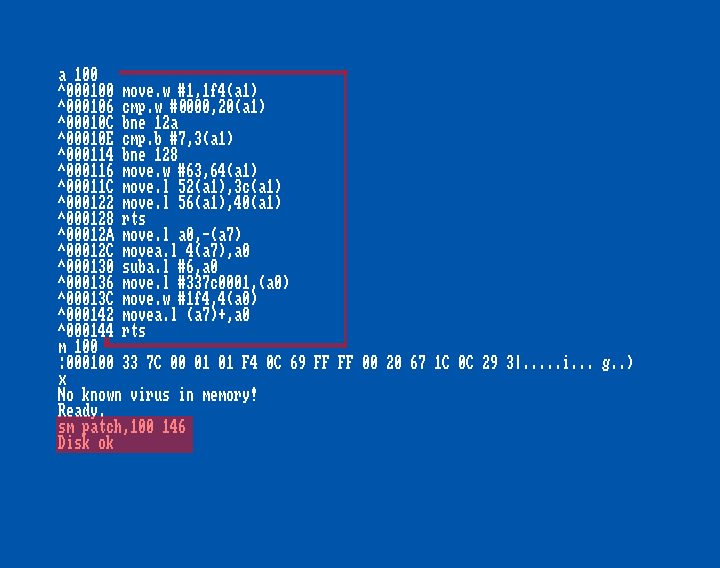
Now we have finished our final patch insert a blank disk and save the patch to it.
SM patch,100 146
Now reset your Amiga and load your patch to 100 and out the JSR at the fire button code and test it out.
This time after the protection check make sure to check the level select screen wit hthe code EDJI and also play the game a little to make sure no weird player positions happen 😛
If you are really paranoid put a break point at address 116 to confirm it no longer gets activated after the protection screen.

Now we have our working patch it is time to put it on the disk and make it run all by itself.
Put in your disk and take a look at its contents by typing DIR
Next we want to know what file is executed on start up so load the startup-sequence to 10000
LM startup-sequence,10000
If we look at 10000 with H 10000 we see it loads file ANOTHER

So now we want to load file ANOTHER to 10000
LM another,10000
now we want to find our fire button code …remember how we found it earlier on in this tutorial?
FA BFE001
Once found we insert our JSR 100 over it and then save it back to disk
SM another,100000 170e0

Next we need to put our patch at address 100.
There are several ways of doing this.
1. Make a file executable and add it to the startup-sequence
2. Add a cracktro and insert the patch code into it and place it at 100 via the cracktro
3. Make the bootblock do all the work
I will be going with option #3 and let the bootblock load the code to $100
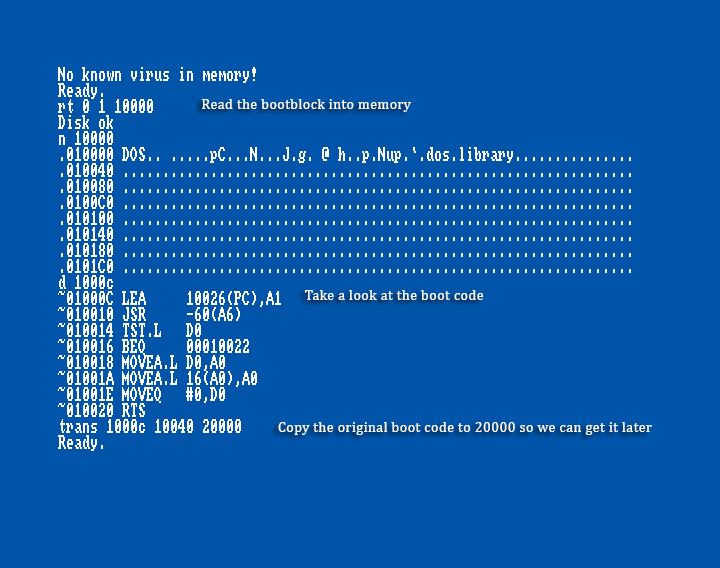
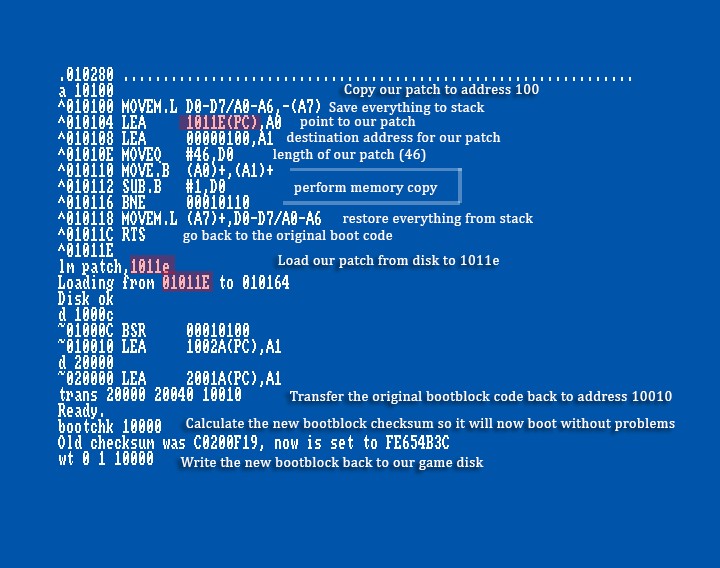
We want to read the bootblock into memory so we use the read track function
RT 0 1 10000
Take a quick look at it with N 10000
Then disassemble it with D 1000c (1000c because this is where the code of the bootblock starts)
We can see with the N10000 part that the code is not very big so lets move it to 20000 for use later
TRANS 1000c 10040 20000
Now we edit the bootblock with a branc hto a subroutine to 10100 because there is a lot of empty space there
A 1000c bsr 10100
Then make a copy patch routine at 10100
MOVEM.L D0-D7/A0-A6,-(A7)
LEA 1011E(PC),A0
LEA 100,A1
MOVEQ #46,D0
LOOP: MOVE.B (A0)+,(A1)+
SUB.B #1,D0
BNE LOOP
MOVEM.L (A7)+,D0-D7/A0-A6
RTS
….Load our patch here with LM patch….
Now we need to get the original bootcode back from 20000 and put it after our bsr @ 10010
TRANS 20000 20040 10010
and finally we need to calculate the new botblock checksum otherwise the Amiha wont let it boot.
bootchk 10000
And write it back to disk with the Write Track function
WT 0 1 10000
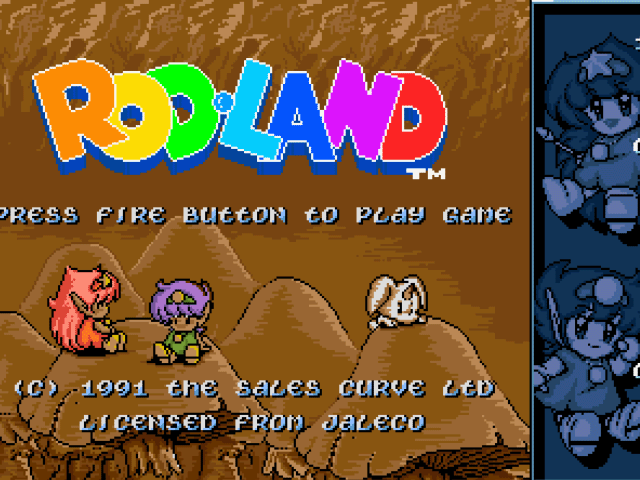
Congratulations you now have a cracked copy of Out of this World!
And the great thing about this patch is it works on ALL VERSIONS of this game
USA/UK/FRENCH
All you need to do is patch the file ANOTHER @ the joystick code part (FA BFE001)with a JSR 100 and use this same bootblock.
Ouaaa.
Amasing work.
You converted a codewheel to Flash? Awesome! A new category perhaps? 🙂
hehe 2 second job. I do wonder tho about other code devices and what they looked like
Slick crack, well done M9 🙂
Very clever way to crack the game, well done!!
Massive! This is just great!