Single-filing
“Stack Up” (c)1991 Zeppelin
Things you will need:
- 1. The original of “Stack Up (c) 1991 Zeppelin”. The CAPS (SPS) version (numbered 0831) is the one I’ve used here.
- 2. An Amiga or a copy of UAE.
- 3. An Action Replay 3 cart (or ROM image for use w/ UAE above).
- 4. Asm-One or any other decent assembler.
- 5. StoneCracker v4.xx or any “Pro” decruncher.
Ok, you all know what the first step is by now… let’s try copying the disk and see if that tells us anything useful:

The entire disk is copyable, except the upper side of track 0. I think most of you reading this tutorial know why this is – Copylock!
Bring up the AR…
>>> rt 0 1 10000

>>> d 1000c
This reads in the track containing the bootblock @ $10000, and then we disassemble it from $1000c (skipping the DOS header, checksum, and location of the root block).

The bootblock does the following:
- 1. Allocates 32k of chipmem (_LVOAllocMem @ $1001E)
- 2. Loads 32k of data from disk into this address (_LVODoIO() @ $1004A)
- 3. Turns off multitasking (_LVOForbid() @ $1005A)
- 4. Goes into Supervisor mode (_LVOSuperState() @ $10062)
- 5. Jumps into the loaded code (“JMP (A3)” instruction @ $10066
We want to investigate the loaded code before it is executed, so lets modify the JMP (A3) instruction to a “BRA FOREVER” loop, and write this altered bootblock back to our copied disk.
>>> a 10066

BRA 10066

>>> bootchk 10000

>>> wt 0 1 10000
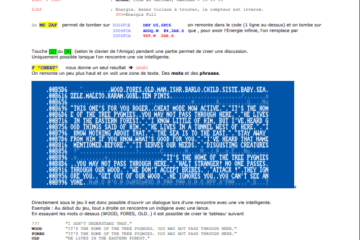
Reboot and let it load for a few seconds until disk activity halts, and enter the AR again, and you should find yourself looking at a little piece of code that copies most of itself to $78000 onwards, and then jumps there… remember the bootblock asked for 32k of memory and accesses this using register A3, so the addresses in the screenshot you see here may not match what you see if you do it yourself.

So, after replacing the JMP (A3) instruction we modified in the bootblock, we’ll modify the JMP $78000 instruction to “BRA FOREVER” and let execution continue. We can see it copies $1C01 longwords, so we want to break back into the AR after a couple of seconds wait, and save $1C01*4 bytes (28676) from $78000 to $7F004 to our workdisk.
>>> sm 1:stackup_078000.bin,078000 07f004
As soon as we start disassembling the code @ $78000 onwards, we can see a JMP $4CE82 instruction @ $78080. Since there is nothing there at the moment, we know one of these BSR’s must call a loader. We disassemble each subroutine in turn, and discover that the routine @ $780F6 smells suspiciously like a setup for a loader.
A little more digging, either by disassembling and following the code @ $78A9E, or simply by changing the parameters being passed to this routine and seeing what effect they have, shows us that the important values for our purposes are passed in registers D2 (number of sectors to load) and A0 (load address).
So for the first call to the loader, we can see its going to load $3F sectors of data to address $6E000. We set a breakpoint on $78116, and let the loader do its work… our breakpoint hits, and we save $7E00 bytes from $6E000 to our workdisk ($3F sectors, each of $200 length).
>>> sm 1:stackup_06e000.bin,06e000 075e00
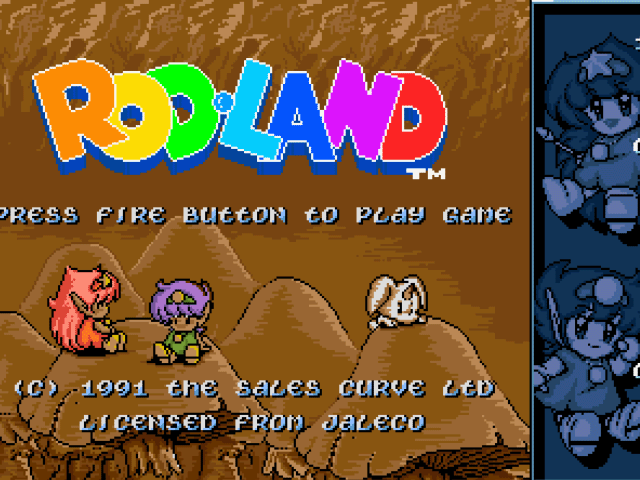
If we take a look at the bitplane pointers using the “E E0” command, we can see that the data we just loaded is the title picture (since the bitplanes are pointing at $6E000 onwards, which is the same address passed to the loader).

The next subroutine of interest to us is @ $78124. We can see it’s another call to the loader, so we proceed exactly as before, and taking note of the values in registers D2 and A0, we breakpoint on $78144, and save out the correct amount of data to our workdisk (remember, number of sectors * $200).
>>> sm 1:stackup_00fe00.bin,00fe00 052200
265k of data or so, it would be fair to assume at this point that this is the main game file…especially as we don’t see any further calls to the loader. However, what’s that evil-looking code lurking around $78154?

If you have read any of the tutorials on Flashtro before, and even if you haven’t, you probably recognise this as the setup for a Rob Northen Copylock protection. Since this is a tutorial about single-filing the game, and not cracking Copylock, I’m going to skip this stage (there are no ‘hidden’ checks inside the encrypted Copylock, and in fact you can completely avoid it even without committing the cardinal sin of hardwiring the valid key or branching over the copylock to the end) – we will simply bypass it by inserting an RTS instruction @ $78154.
If you’re interested, you can continue disassembling and at $78A78 you will see the CMP.L test for the correct key…
At this stage, if we exit the AR the game will start, and you can enjoy (perhaps ‘suffer’ is more appropriate) the stacking action for a while. Note, no disk accesses – there are only 2 files of any importance on the disk (the title picture, and the main game itself) and we have ripped both of them to our workdisk. Now all that remains, is to combine all this data and make it into a single file!
The things we need:
- 1. stackup_06e000.bin (The title picture).
- 2. stackup_00fe00.bin (The main game).
- 3. A small piece of code to display the title screen and wait for LMB/fire, and then start the game.
1 + 2 are taken care of, let’s create 3.
Before we load up Asm-One, we need to grab 2 more things from game memory. First, the copperlist + ‘init’ routine the game uses to setup bitplanes and other custom registers. We find this @ $78086 – the first instruction here points the amiga to a copperlist @ $780D2, and sets up various other hardware registers. To make sure we’re in the right place, we can make use of the AR’s copper disassembler feature (‘C 780D2’).

How you get this data into your assembler ‘shell’ for the single-filing is up to you, personally I just scribbled the few instructions and the copperlist down, and typed them back into Asm-One – if there was a bit more code or a far more complex setup routine, you would obviously save out the bits of code you wanted and either Incbin them into your source and patch them, or use ReSource or other disassembler to give you the source which you can include and modify.
We also need the palette for the title picture, which we can see being copied into the palette registers ($DFF180 onwards) at the tiny loop beginning @ $78048. Again, we can either save 32 bytes from $7D872 (16 colours * 2 bytes each) to disk, or just take a note of them and enter them back into Asm-One when the time comes.
At this point we have everything we need to single-file the game, so load up Asm-One and check out the included source-code (should be a link to it at the top of this page). The source is thoroughly commented, so I won’t go into any details here – if you’re interested, take a look at the code!
Assemble this with your cracksource disk in df0: and the workdisk with the files we saved out in df1:, and you should see something like this:

We know the game data should start in memory @ $FE00, so we must subtract the length of our ‘stub’ from this to get the address we need to load/depack to. I labelled the start/end of my setup code, so as you can see from the picture above, Asm-One can easily calculate this for us ($FCCC).
Now that we have our single-file, it’s time to fire up everyone’s favourite cruncher – StoneCracker!
Thanks to Asm-One, we know we need to load + jump to $FCCC. We know this is an absolute address, and that we want to utilise the Pro decruncher. We know that $F000 would be a safe place for the decruncher, and we can safely set the stack pointers to $80000 (SSP) and $7FC00 (USP) without problems. All that remains is to set the initial value of the status register to $2000 (irqs off) before we begin, and it’s time to load + pack!

Save this file out, reset, and test your creation.

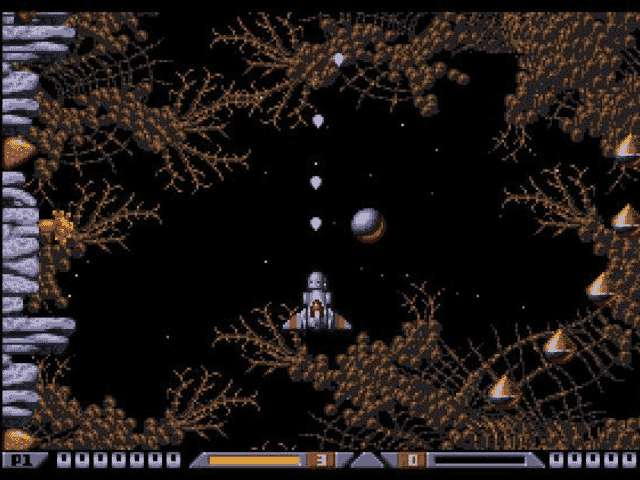
Press LMB or fire on the joystick, and the game starts… job done!

From an entire uncopyable disk, to a single 108k file in a few very easy steps.
Until next time…
-WK
hehe shit.. wayne finally got around to making a tutorial.. Im pretty sure this is one of 10 biblical signs
that mark the end of the world.. 🙂 dont worry though i beleive the final sign is wayne creating a tune and im pretty sure interplanetary populating would already be around by then 🙂 nice one wayney.. hope to see u in 2k7 sometime.
Congrats WK 😀 You are now putting stress to the rest o lazy crowd.. :p